Sweet potatoes are not only delicious and nutrient-rich, but also easy to grow. All you need is a little patience, some slips (which we’ll explain later), and plenty of sunshine.
In this guide, we’ll cover everything you need to know to grow sweet potatoes at home—from starting slips and preparing your soil to harvesting your tasty crop. Let’s get your garden (or pots) ready for some sweet success!
Jump to Section [Hide]
- Understanding Sweet Potato Slips
- Getting Ready to Grow
- Preparing the Planting Area
- Planting Sweet Potato Slips
- Growing Sweet Potatoes in Containers
- Caring for Sweet Potato Plants
- Managing Pests and Plant Diseases
- Harvesting Sweet Potatoes
- Curing and Storing Sweet Potatoes
- Troubleshooting & Tips for Bigger Yields
Understanding Sweet Potato Slips
Growing sweet potato slips is simple and fun! You’ll prepare tiny sprouts from the tubers to start new plants.
What are sweet potato slips?
Sweet potato slips are sprouts that grow from mature sweet potatoes. They are the only way to propagate most varieties since these plants do not produce true seeds. Slips typically measure 6–12 inches long and already have roots by the time they’re ready to transplant.
You can buy slips or grow them yourself at home. Always use disease-free sweet potatoes to avoid issues such as Fusarium wilt or scurf. Most gardeners start their slips about 8 weeks before the last frost date in their area, giving them ample time to develop strong roots for outdoor planting.
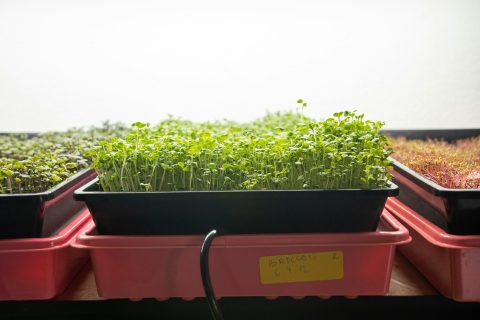
Starting slips in water (jar method)
Use a clean, disease-free sweet potato as your starting point. Place it halfway into a jar of water with the pointed end down. Use toothpicks to hold the top half above the rim. Position the jar in a sunny location, like a windowsill.
Change the water every few days to avoid rot or bacterial growth. Within 1-2 weeks, sprouts will appear on the tuber’s surface. Allow them to grow until they reach 6–12 inches in length and develop roots at their base.
Gently twist each slip off when ready. Handle slips carefully to prevent damage before transplanting them outdoors later on!
Starting slips in the seed-starting mix or soil
Start with a clean, disease-free seed-starting mix or well-draining soil. Maintain soil temperature above 65°F to ensure strong slip production. Coconut coir or compost provides extra nutrients.
Avoid using high-nitrogen fertilizers, as they promote vine growth rather than healthy slips.
Place sweet potato roots about halfway into the soil, leaving the top exposed. Water the soil lightly, keeping it moist —not soggy. Slips in soil often develop stronger roots, making them easier to transplant.
With proper care, slips should be ready in 6–8 weeks.
When and how to harvest slips
Harvest when slips reach 6–12 inches long and have firm roots. This usually occurs about 8 weeks after starting them, just before transplanting. Use clean tools to carefully separate the slips from the mother root, avoiding any damage to their delicate roots.
Pick only healthy-looking slips with no signs of disease or discoloration. Handle each slip gently to prevent breakage. Discard weak or damaged slips to ensure strong plants later.
Soak rooted slips for a few hours when planting bush varieties in containers, as this improves their chances of thriving.
Getting Ready to Grow
Start by picking the right sweet potato variety for your area. Make sure you have all the tools and supplies ready before planting.
Choosing the right variety for your region
Pick a variety based on your growing season and climate. For cooler areas, early varieties like Beauregard or Georgia Jet are best. They need about 90 days to mature and thrive in nights above 60°F.
In warmer regions with longer seasons, choose midseason varieties such as Centennial (100 days) or late varieties such as Jewel (120 days).
Bush-type plants such as Vardaman work well in containers or small gardens because their compact vines are under 4 feet long. Vigorous vining varieties are well-suited to larger spaces but require more space to spread.
Match the heat units of about 1,200 per season if choosing an early type in northern zones.
Knowing the best time to plant
Sweet potatoes need warm weather and soil to thrive. Plant slips 3–4 weeks after the last frost in spring. Soil should be at least 65°F (18°C) with nighttime temperatures above 55°F (13°C).
For most regions, late June to early July is ideal, typically between June 25 and July 5.
You’ll need about 4 months of warmth for strong growth —about 90–120 days. Monitor local conditions closely before planting. Starting your slip production eight weeks ahead of the last expected frost ensures you’re ready on time!
Tools and materials you’ll need
You will need a garden fork or spade to loosen the soil. Choose neutral soil with a pH of 5.8–6.2 for best results. Compost, coconut fiber, or perlite are great additions for improving drainage and nutrient availability.
Black plastic mulch helps warm the soil, especially in cooler areas. Use a seed-starting mix, slips in jars, and organic mulch, such as straw, to retain moisture in the soil. A high-phosphorus fertilizer at planting also boosts root growth; side-dress with a 5-10-10 fertilizer after three weeks.
Consider row covers for pest protection.
Preparing the Planting Area
Healthy soil makes strong sweet potatoes. Get your garden ready with the right mix and proper care.
Soil requirements and pH level
Sweet potatoes grow best in loose, well-draining soil. Sandy soil works excellently, but you can use raised beds if your yard has heavy clay. The beds or mounds should be 10 to 12 inches high to provide proper drainage and space for roots to expand.
Keep each bed at least 12 inches wide.
Check the pH level before planting. A neutral soil pH between 5.8 and 6.2 is ideal, but they can tolerate slightly acidic soil down to pH 5.0. Avoid adding animal manure, as it can raise nitrogen levels too much, leading to poor tuber growth rather than healthy sweet potato vines!
Enriching soil with compost and amendments
Mix compost into the soil to boost nutrients and improve drainage. Use only disease-free compost to prevent introducing harmful pathogens. Apply aged manure about 2 months before planting to ensure steady nutrient release.
Include other amendments, such as perlite or coconut coir, to enhance fertility and aeration. Apply a 5-10-10 NPK fertilizer 2 weeks before planting. At planting, use all phosphorus, half the nitrogen, and a quarter of potassium for balanced growth.
Avoid excess nitrogen, as it leads to thin roots and excessive vine growth.
Creating raised beds or mounds for optimal drainage
Build raised beds 6–8 inches tall and 12 inches wide to improve drainage. Space them 3 feet apart to give sweet potatoes room to grow. If your soil is heavy, raise the beds to about 10–12 inches.
This helps roots thrive in moist conditions without rotting.
Use black plastic mulch on the beds to warm the soil and increase yields. It keeps moisture in, too. Raised beds are a must in areas with high rainfall, as they keep tubers dry and healthy.
Prepare these mounds 2–3 weeks before planting slips for best results.
Sunlight and spacing considerations
Sweet potatoes need full sun to grow well. Pick a sunny spot in your garden, away from tall plants that may block light. Sunlight helps the tubers develop and keeps diseases like white rust at bay.
Space slips 12–18 inches apart within rows to prevent overcrowding. Leave at least 3 feet between raised mounds for vines to spread freely. Proper spacing reduces the risk of diseases and pests, such as sweet potato weevils, while helping roots form firm storage tubers.
Planting Sweet Potato Slips
Place your sweet potato slips in the soil, give them space to grow, and water them well.
When to transplant slips outdoors
- Transplant slips 3 to 4 weeks after the last spring frost. Night temperatures must stay above 55°F (13°C). Check your soil temperature before planting; it should be at least 65°F (18°C).
- Aim for late June to early July, between June 25 and July 5, as this is often ideal.
- Slips need to be healthy and ready. They should measure about 6–12 inches long with roots attached. Avoid delays in transplanting, as they can lower your yield. Be sure the weather conditions are stable, as cold spells or excessive precipitation can harm young plants.
Proper planting depth and spacing
- Plant slips deep enough to bury the roots and stem, leaving the leaves exposed. This helps keep the plant stable and encourages strong root growth. Slips with 5-8 nodes are best for producing sweet potato tubers.
- Space each slip 12-18 inches apart in rows. Keep rows about 3 feet apart for proper airflow and room to grow. Raised mounds should be 6-8 inches tall and 12 inches wide for the best drainage.
- Gently press the soil around the roots to ensure good contact. Avoid planting too shallow, as this can cause the plant to dry out quickly.
Watering after planting
- Water the sweet potato slips thoroughly during the first week. Aim to keep the soil moist, not waterlogged. Deep watering in midsummer helps roots grow stronger and deeper into the ground.
- Use well-draining soil to avoid waterlogging, which can harm root tubers. Apply a high-phosphorus fertilizer with your first watering to promote root development. Add mulch after planting to hold moisture and reduce weed growth.
- If rainfall is low, water regularly to support healthy growth without overwatering in late summer.
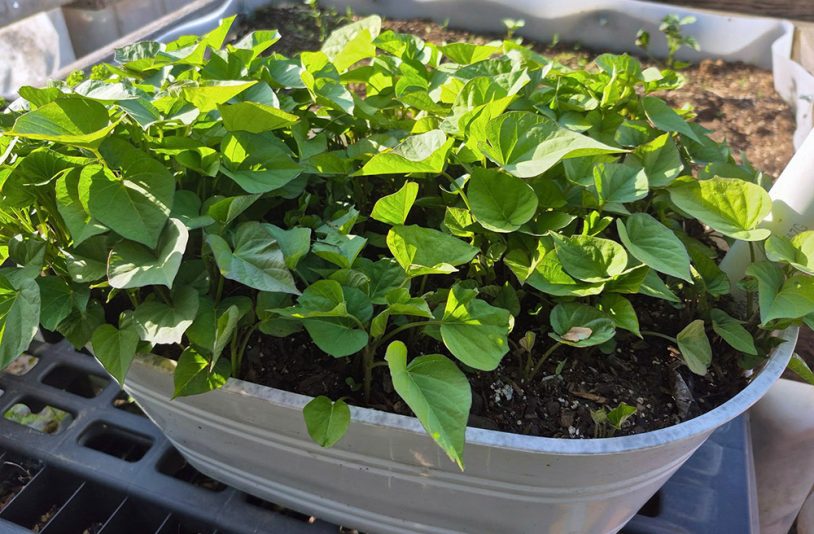
Growing Sweet Potatoes in Containers
Growing sweet potatoes in containers is perfect for small spaces. Use the right potting mix, and you can still enjoy a plentiful harvest.
Best containers to use
- Use deep containers with a minimum depth of 12 inches to support root growth. Half-barrel containers, holding 20–25 gallons, are ideal for achieving higher yields. For smaller spaces, a 10-gallon container can accommodate up to three plants, while a 20-gallon container can support four to six plants.
- Always use food-safe materials for your pots when growing edible crops. The container should have multiple drainage holes to prevent waterlogging and rotting roots. Leave enough room for spacing slips about 12–18 inches apart inside the pot. Avoid small or shallow options as they reduce tuber size and overall production.
Ideal soil mix and drainage
- Choose a compost-rich, well-draining potting mix for growing sweet potatoes. Add perlite or coconut coir to improve drainage and prevent waterlogged roots. Fill containers with at least 12 inches of soil mix to give the tuberous roots enough room to grow.
- Ensure your container has several drainage holes to prevent root rot. Refresh the soil every season to lower the risk of disease buildup. Keep the soil pH between 5.8 and 6.2 for healthy growth and optimal yields.
- Avoid using too much nitrogen, as it encourages vine growth at the expense of root development.
Container care and sunlight needs
- Place your containers in a spot that gets full sun for 6–8 hours daily. Rotate them often to ensure all sides get equal light. This helps the sweet potato vines grow evenly and stay healthy.
- Water consistently since containers dry out faster than garden soil. Add mulch to the soil to retain moisture and prevent weeds from sprouting. Watch for pests like field mice, rats, or rabbits near your plants.
- Use row covers if needed for extra protection.
Tips for maximizing yield in small spaces
- Choose bush-type or early sweet potato varieties for compact growth and faster harvests. Soak the roots for several hours before planting them in containers to give them a healthy start.
- Apply high-phosphorus fertilizer at planting to promote tuber formation. Limit nitrogen levels to prevent excessive vine growth, which can divert energy from the roots.
- Rotate the positions of your containers each season to avoid soil compaction. Keep the soil moist but not soggy to prevent drought stress. Remove any flower buds as soon as you see them to ensure the plant focuses on tuber growth.
- Harvest the sweet potatoes as soon as they reach a good size, as limited space can affect their growth.
Caring for Sweet Potato Plants
Keep your sweet potato plants healthy with proper watering, smart pruning, and mulch to retain moisture.
1. Watering schedule and techniques
Water sweet potato plants deeply during midsummer. This encourages strong tuber growth. Keep the soil moist during the first few weeks after transplanting. Consistent moisture helps slips establish roots quickly.
Avoid overwatering to prevent waterlogged soil, as sweet potatoes need good drainage. Stop heavy watering late in the season to avoid cracked roots. Use mulch to retain moisture in hot weather, and water container plants more frequently to prevent drying out.
Keep the soil slightly moist during tuber formation to promote healthy growth.
2. Fertilizing without overdoing nitrogen
Use a 5-10-10 fertilizer about three to four weeks after transplanting. This ensures plants get the nutrients they need without overloading them. Apply all phosphorus, half the nitrogen, and one-quarter of potassium at planting time.
Phosphorus helps with vigorous root growth early on.
Avoid animal manure and high-nitrogen fertilizers. Excessive nitrogen leads to weak, thin roots and excessive vine growth. Use disease-free compost to enrich your soil naturally instead. You can add another round of fertilizer mid-season for extra support if needed, but avoid delays as late fertilizing reduces yield quality.
3. Mulching to retain moisture and control weeds
Spread mulch around your sweet potato plants two weeks after planting. Organic options like straw, wood chips, or compost work well. Black plastic mulch is another choice, especially in cooler areas.
It warms the soil and boosts yields.
Mulch keeps the soil moist and reduces the need for frequent watering. It also blocks sunlight from reaching weeds, stopping them from growing. Mulch can also help prevent sudden temperature changes in the soil.
A thick layer, such as straw, provides additional protection during frost. Keep it away from stems to avoid rot. Use this simple step to protect roots and improve your harvest.
4. Pruning vines (when and why)
Avoid cutting sweet potato vines unless necessary. These vines act like living mulch, keeping the soil moist and cool while shading out weeds. Trimming them too much can lower your yield, as the leaves are vital for photosynthesis and tuber growth.
If vines encroach on walkways or compete with other plants, trim only the excess. Never use pruned vines for replanting if disease is present. Over-pruning can stress your plants, expose tubers to sunlight, and reduce storage life after harvest.
In most cases, letting them grow freely works best.
Managing Pests and Plant Diseases
Pests and diseases can harm your sweet potato plants if ignored. Learn simple ways to protect your crop and keep it healthy.
Common pests include sweet potato weevils, wireworms, and others
Sweet potato weevils and wireworms are troublesome pests for sweet potatoes. Sweet potato weevils lay eggs in stems and roots, causing the plant to rot. Wireworms, the larvae of click beetles, burrow into roots, making them unfit to eat.
Flea beetles leave small holes in leaves and can weaken plants. You can use row covers or mulching to keep them away.
Deer, rabbits, and rodents are also threats. Deer might eat leaves and roots, while rabbits go after new growth. Field mice and rats often hide under black plastic mulch, nibbling on roots.
For pocket gophers and voles, sonic devices or pets can help reduce damage. Stay alert for signs of damage, such as wilting leaves or eaten plants, and take action promptly.
Organic pest control methods
Use row covers to protect young plants from rabbits and flea beetles. Mulching stops some pests while keeping weeds in check.
Introduce beneficial insects, such as ladybugs, to help control flea beetles naturally. For whiteflies, apply insecticidal soap and destroy any infested plants right away. Sonic devices or pets can help control pocket gophers and voles in your garden.
Rotate crops each season to reduce the buildup of soilborne pests. Always disinfect tools after use to prevent the spread of diseases such as scurf.
Signs of disease and how to treat or prevent them
Yellow, puckered leaves and wilting vines often point to Fusarium wilt. This can also cause stem discoloration. Avoid it by planting disease-free sweet potato slips and rotating crops yearly.
Disinfect your gardening tools to stop the spread.
Dark spots on roots signal scurf. Use clean plants and disinfected tools to prevent it. Chalky, white blisters on leaves mean white rust. Remove and destroy infected plants right away.
Rotate crops to reduce future risks. To maintain healthy plants, enrich the soil with compost and maintain a neutral soil pH.
Harvesting Sweet Potatoes
Dig up sweet potatoes gently with a garden fork. Handle the roots with care to avoid bruising or cuts.
How to tell when sweet potatoes are ready
Watch for yellowing leaves or vine ends. This happens around 100 to 120 days after planting. Early varieties can mature in as little as 90 days. Check if the roots are big enough by gently pulling one from the soil.
Sweet potatoes taste better and store longer when harvested at the right time.
Finish digging them up before the first frost. Cold soil below 55°F can cause the roots to rot. Avoid waiting too long, as frost will damage the crop. Healthy vines that begin to die back often signal it’s time to harvest.
Proper harvesting techniques to avoid damage
Use a garden fork or clean, sharp tools to dig out sweet potatoes. Loosen the soil 18 inches around each plant and 4–6 inches deep. This reduces the chance of cutting or bruising the roots.
Be gentle when lifting tubers to prevent skin damage.
Shake off loose dirt, but do not wash roots after harvesting. Washing can weaken the skin and lead to early rot. Collect tubers immediately to prevent sunscald. Do not leave them in direct sunlight for extended periods after digging.
Treat each root with care, as even minor injuries can compromise storage conditions later on.
Handling roots gently after harvest
Shake off excess dirt from the roots without washing them. Washing can damage the skin and invite rot. Handle each sweet potato gently to avoid bruising or cutting its delicate surface.
Place the harvested roots in a shaded, dry area immediately. Avoid stacking them too deeply for proper air circulation. Use soft gloves or padded containers for moving them to prevent unintended damage.
Keep them out of rain and direct sunlight to maintain quality before curing begins. Scrutinize each root for signs of disease or damage during this process.
Curing and Storing Sweet Potatoes
Curing sweet potatoes helps their skin toughen and makes them sweeter. Store them in a cool, humid spot to keep them fresh longer.
Why curing is important
Curing sweet potatoes boosts their sweetness and flavor. It also helps heal cuts or bruises from harvesting, reducing the risk of fungal problems later. Skipping this step can lead to faster rotting and lower quality.
Keep them at 80°F to 90°F with high humidity for 10 to 14 days. This process forms a protective layer on the skin, allowing it to remain effective for up to 6 months in storage. Do not wash the roots before curing, as water increases the risk of decay.
How to cure sweet potatoes properly
Place sweet potatoes in a warm spot, around 80-90°F. Maintain high humidity, close to 90%, for about 10 to 14 days. Shake off dirt gently; do not wash them before curing. High humidity helps toughen the skin and seal any minor cuts.
After curing, wrap each sweet potato in newspaper. Store them in a well-ventilated container at 55-65°F, with some moisture in the air but not too much. Well-cured sweet potatoes can last up to six months and taste sweeter over time! Avoid storing damaged items, as they spoil faster and can spoil nearby items.
Ideal long-term storage conditions
Store cured sweet potatoes at 55-60°F with high humidity. A basement or root cellar works well for maintaining these conditions. Avoid refrigeration, as cold temperatures can cause spoilage and fungal growth.
Keep the storage area ventilated to prevent moisture buildup.
Handle sweet potatoes gently to avoid bruising or rot. Properly cured roots can last up to six months in good conditions. High humidity keeps them fresh without drying out. Check them regularly and remove any that show signs of decay to protect the rest from damage.
Tips to prevent sprouting and rotting
Cure sweet potatoes at 80°F to 90°F with 90% humidity for 10 to 14 days. This toughens their skin and helps them last longer. Keep them separate during curing to prevent contact.
Contact can lead to sprouting or rotting.
Store cured sweet potatoes at 55°F to 60°F in a humid place. Use wooden boxes or baskets for airflow. Check them often for signs of rot. Remove any spoiled ones right away. Do not wash them before curing, as moisture can speed up decay.
Discard bruised sweet potatoes after curing to avoid spreading damage.
Troubleshooting & Tips for Bigger Yields
Watch for slow growth, yellow leaves, or small roots, adjust watering, improve soil nutrients, and space plants more closely for a bigger harvest!
Signs of poor growth and what to do
Yellowing leaves and wilting vines show poor growth. Stunted roots may also appear. Avoid excessive nitrogen, as it can lead to thin tubers rather than healthy ones. Use a balanced fertilizer, such as 5-10-10, three to four weeks after transplanting.
Water weekly during dry spells to aid root development. Pests such as wireworms and sweet potato weevils can harm your crop, so inspect regularly. Apply mulch early to keep soil moist and control weeds more easily for better results.
How to boost production organically
Fertilize your plants with organic compost or a balanced fertilizer like 5-10-10. This gives the soil nutrients for healthy sweet potato vines and roots. Enrich the ground with compost before planting to improve nutrient uptake.
Use mulch made of straw or black plastic. It retains soil moisture and warms it, helping growth. Rotate crops every season to prevent pests and soil problems. Start disease-free slips indoors about eight weeks before frost ends to produce more vigorous plants later.
Rotating crops and preventing soil fatigue
Plant sweet potatoes in a different spot each year. This prevents soil fatigue and keeps the soil healthy. Avoid planting sweet potatoes in the same bed for at least three years. This practice also reduces pests, such as sweet potato weevils, and lowers the risk of disease.
Rotate with crops like beans, squash, or eggplant. These plants use different nutrients from the soil. Adding compost or mulch helps keep the soil rich during crop rotation. Maintain a neutral soil pH between 5.8 and 6.2 for the best results.
Regular weeding keeps your beds nutrient-rich and ready for healthy growth.
Final Tips
Growing sweet potatoes can be rewarding and fun. With proper care, you’ll enjoy a healthy, tasty harvest. Focus on sunlight, soil, and timing for the best results. Start small if you’re new, and learn as you grow.
Your effort will pay off with sweet, delicious roots at the end!