Growing pumpkins can be a fun and satisfying activity, whether you plan to carve them or cook with them. Even if you have never gardened before, pumpkins are simple to grow once you know how.
This guide covers everything from choosing the best spot in your yard to knowing when to harvest your pumpkins. Get your gardening gloves ready, and let’s start growing pumpkins together.
Jump to Section [Hide]
When and Where to Grow Pumpkins
Pumpkins need the right time and place to thrive. Select a sunny spot and plan for warm weather.
Ideal planting season and climate conditions
Plant after frost risk is gone and the soil warms to 65°F. Late May works in northern areas, while early July suits the southern regions. Plant too soon, and pumpkins may rot before Halloween.
Use black plastic to warm the soil a week in advance in cooler areas. Pumpkins need full sun and compost-rich dirt. They tolerate short dry spells but require additional water during summer’s dry periods.
Choosing the right location
Pick a sunny spot with full sun all day. Pumpkins need well-drained, rich, sandy soil to grow strong and healthy.
Leave sufficient space for the vines to spread. Small varieties can be spaced closer together, but large pumpkins need 8–10 feet between mounds. Use a garden edge for planting so the vines can trail without crowding other plants.
Ensure each vine has at least 3–5 feet of room, depending on its type.
Soil Preparation and Site Setup
Get your soil ready for pumpkins with care—it’s their foundation to thrive. Pick a sunny spot and prepare it well for healthy growth!
Soil requirements
Pumpkins grow best in sandy, well-drained soil that is rich in nutrients. The soil should have a pH between 6.0 and 6.8 to support healthy plants. Test your soil every one to two years to check its fertility and pH levels.
Add compost or aged manure before planting to improve organic matter. Use no more than 1 inch of compost per 100 square feet of garden area. Each pumpkin vine grows best on a mound about three feet wide with enriched soil underneath it.
Testing and amending soil pH
Test your soil pH before planting. The ideal range for pumpkins is 6.0 to 6.8. Use a simple home test kit or send a sample to your local Extension agency for results. If the pH is too low, add lime to raise it.
For high pH, use sulfur or peat moss.
Amend the soil with aged compost or rich organic matter if needed. Spread several inches deep to enhance nutrient availability and improve structure. Follow label instructions carefully if you use products like Miracle-Gro Performance Organics for adjustments.
Proper soil pH ensures strong growth and healthy fruit development!
Creating planting mounds or hills
Build mounds 3 to 4 feet wide, spaced 4 feet apart. If you’re planting vining pumpkins, leave even more room, about 50 to 100 square feet per hill.
Place 4 to 6 seeds in each mound at a depth of 1 to 2 inches. After the plants sprout two leaves, thin them to two strong plants per mound. Use black plastic mulch over the soil to retain warmth and control weeds.
It also retains moisture and supports early planting in cooler climates.
Starting from Seeds or Transplants
Start with healthy seeds or young plants to get strong pumpkins. Pick a method that fits your space and growing timeline—both work great!
Seed preparation
Soak your pumpkin seeds overnight in water. This helps them sprout faster and grow better. Use healthy, disease-free seeds for strong plants.
Plant the seeds 1 inch deep in soil enriched with compost. Avoid cracked or damaged ones. Seeds will grow best if the soil is warmer than 65°F. For small sugar pumpkins, plant 2–3 seeds every 2 feet.
Direct sowing vs. starting indoors
Plant seeds directly outdoors after the last frost. The soil temperature should be at least 65°F. Direct sowing works best in warmer areas with long growing seasons or for planting on mounds and hills.
Start seeds indoors if you live in cooler regions. Begin 2–4 weeks before the last expected frost date using peat pots or a potting mix. Transplant seedlings when the soil has warmed up to ensure strong growth.
Use row covers early on, but remove them once flowers appear or temperatures exceed 90°F.
When and how to transplant
Transplant seedlings after frost danger is gone, and the soil warms to at least 65°F. Space them 2–3 feet apart in rows that are about 4–6 feet apart. Use only healthy plants with at least two true leaves for better success.
Harden off the seedlings by placing them outside for a few hours each day over 3–5 days before planting. Water deeply right after transplanting to help roots settle. Black plastic mulch can keep soil warm and speed up growth.
Protect young plants from pests using row covers or tunnels. Avoid root-bound transplants for best results!
Planting Guidelines
Give your pumpkins room to grow. Spacing and proper planting make all the difference!
Proper spacing
Leave enough room for pumpkins to grow well. Vining types need 5–6 feet between hills and 10–15 feet between rows. Semi-bush varieties can be planted in hills 4 feet apart, with rows 8 feet wide.
Miniature varieties take less space, requiring only 2 feet between rows and 6–8 feet between seeds. For large pumpkins, give each mound at least 8–10 feet of room. If planting giant varieties, allow up to 150 square feet per hill to ensure they have ample space to spread out.
Depth for sowing or transplanting
Plant seeds 1 inch deep in moist soil. For warmer places like Utah, sow them 1 to 2 inches deep when the temperature reaches 65°F. Cover the seeds lightly with soil to help them sprout.
Set transplants at the same depth they were growing in their containers. Do not bury seeds deeper than 2 inches, as this may stop proper growth. Miniature pumpkin types also need only a 1-inch planting depth.
Companion planting
Grow pumpkins alongside crops like corn and beans. Corn gives shade, while beans improve the soil by adding nitrogen. Avoid planting near potatoes, as they compete for the same nutrients.
Keep vining crops such as zucchini away to reduce space competition. Use marigolds as borders to deter insect pests. Leave sufficient space between pumpkin mounds and other plants to promote healthy growth.
Rotate pumpkins annually to reduce the risk of wilt diseases and soil issues.
Watering and Fertilizing Techniques
Keep the soil moist, but not soggy—pumpkins need consistent watering. Use plant food regularly to boost growth and keep your plants healthy.
Watering needs
Water deeply once or twice a week. Aim for 1 to 2 inches of water weekly. Use drip irrigation or soaker hoses to keep leaves dry and reduce the risk of diseases like powdery mildew.
Water early in the morning to prevent evaporation.
Keep soil moist but not soggy. Add organic mulches, such as straw or shredded leaves, around plants to retain moisture and reduce watering frequency. Reduce water as pumpkins ripen, but check for wilting before 11:00 a.m.; if they are still wilting, they need more hydration.
Avoiding leaf wetness
Keep leaves dry to prevent diseases like powdery mildew. Use drip irrigation or soaker hoses to send water straight to the base of plants. Wet foliage makes it easier for fungal infections to spread.
Water early in the day if needed. This ensures any wet leaves dry quickly in the sunlight. Add mulch around plants to prevent soil from splashing onto leaves, which can carry harmful pathogens.
Proper spacing helps air flow, keeping moisture off leaves and stems.
Fertilizer schedule
Start with a balanced fertilizer while planting. This accelerates early growth and supports root development. Side-dress plants using nitrogen fertilizer (21-0-0) when vines begin forming runners.
Add 1–2 tablespoons per plant, placing it 6 inches away from the stem.
Switch to high-nitrogen feed as vines grow vigorously. Apply a bloom booster fertilizer once you see flowers starting to form, to encourage pollinated fruit set and proper pumpkin development, such as C.
pepo or Atlantic giant varieties. Avoid applying extra nitrogen late in the season; this keeps the focus on growing healthy fruits rather than leaves or vines. Always follow product labels for amounts and timing to prevent overfeeding your plants!
Caring for Growing Pumpkin Plants
Keep your pumpkin plants healthy by giving them proper care. Small steps can make a big difference in their growth and fruit quality.
Mulching
Apply organic mulch, such as straw, after the soil warms to above 75°F. This retains moisture and prevents weeds from growing. As it breaks down, it improves soil fertility over time.
Black plastic mulch works well early in the season. It heats the ground and allows you to plant sooner. Avoid spreading mulch too soon, as this can trap cold water and air in the soil.
Pruning and vine training
Pinch off the tip of the main vine once it grows 2 feet long. This helps the plant grow side branches, which can lead to more flowers and fruit. For large pumpkins, focus energy on one fruit per plant by removing extra blooms after three or four fruits have formed.
Train vines to grow where you want them by gently moving them. Prune extra vines if plants spread too far. This keeps energy focused on fewer pumpkins and also improves airflow. Remove damaged leaves or diseased parts immediately to promote healthier growth and better sunlight exposure.
Supporting fruit
Lift pumpkins off the ground using wood, cardboard, or newspaper. This keeps them dry and prevents rot. Large ones may need extra support to avoid settling into wet soil.
Move fruit gently to prevent bruising or stem damage. Use gloves and long sleeves, as pumpkin vines can be prickly. Check regularly for signs of decay under supported pumpkins. Remove leaves shading ripening fruit at season’s end for better sunlight access.
Managing Common Pests and Diseases
Keep your pumpkin plants healthy by keeping an eye out for pests like squash vine borers and diseases that can harm their growth—learn how to protect them effectively!
Common pests
Cucumber beetles, striped or spotted, can attack your plants. They harm seedlings, vines, and fruits. Squash bugs are another problem. These gray or brown pests damage vines and lower pumpkin yield.
Aphids may also show up on leaves and stems. They are small and green or black.
Squash vine borers tunnel into vines, causing them to wilt. Hand-pick squash bugs to control their numbers. Spray aphids with soapy water or use a strong stream of water to remove them.
Watch for pests in late summer when they are most active.
Common diseases
Powdery mildew leaves white spots or mold on pumpkin leaves. It can kill the leaves early and slow fruit ripening. Some pumpkin varieties are resistant to powdery mildew; choose those if possible.
Wet foliage and low air flow make it worse. Wilt diseases cause sudden wilting and slimy stems that spread quickly. Remove infected plants immediately to prevent further spread.
Viral infections curl or mottle the leaves. They also stunt growth and distort fruit shapes. Watch for these signs while inspecting your plants regularly. Keep vines dry by watering at the soil surface to reduce the risk of fungal infections.
Rotate crops yearly to prevent recurring issues in your garden soil!
Control options
Use neem oil or pyrethrum in the evening to deal with insect pests. This protects bees, as they are less active then. For striped cucumber beetles, apply row covers early to shield your plants.
Black plastic mulch can reduce pest habitats and control weeds.
Destroy infected plants immediately to prevent disease spread. Select resistant pumpkin varieties to avoid powdery mildew. Rotate crops each year to reduce harmful soil pests.
If needed, contact local Extension agencies for advice on treatments that work best in your area.
Preventive tips
Rotate your pumpkin crops each year. This helps reduce the risk of soil-borne diseases. Pick a new spot that has not grown pumpkins or related plants, like squashes or gourds, for at least three years.
Space your plants far apart for good air circulation. This keeps leaves dry and stops fungal growth. Avoid spraying water on leaves during watering to reduce disease risk. Remove old plant debris after harvest to prevent pests from remaining in the garden over winter.
Troubleshooting Growth Issues
Pumpkins sometimes face problems that can slow their growth. Watch for signs such as weak vines or poor fruit, and act promptly to address them.
Yellowing leaves or stunted growth
Yellowing leaves often mean a lack of nitrogen. Test your soil and add compost or a balanced fertilizer if needed. Poor drainage can also cause yellowing; check for water pooling near the roots.
Overwatered plants may suffer from root rot, leading to weak growth.
Stunted growth can happen with compacted soil. Loosen the ground before planting to help roots spread. Viral infections and pests like aphids might also harm your plant’s health.
Watch for curling leaves or mottled patterns as warning signs, and use insecticidal soap to control pests quickly.
No fruit development
Male flowers grow first and do not produce fruit. Female flowers need time to develop, often after the plant matures.
Stress can stop female flowers from forming. Excessive heat, poor soil nutrition, or insufficient water may cause issues. Bees are key to pollination. Without them, fruits won’t grow.
Hand-pollinate with a Q-tip if bees are absent. Avoid overusing nitrogen fertilizers, as they promote leaf growth rather than fruit production.
Remove female flowers during the first three weeks of growth to shift energy toward stronger plants later on. Once 3–4 fruits are set on the vine, pinch off extra blooms to help those pumpkins grow larger and healthier!
Excessive vine spread
Excessive nitrogen can cause vines to grow too long. This takes energy away from the pumpkins. Pinch the main stem tip once it reaches 2 feet to stop continuous growth and promote branching.
Prune excess vines to prevent crowding and promote fruit development. Train them along rows or paths for neat growth. Space plants properly, keeping each hill far enough apart for air flow and light.
For giant pumpkins like C. maxima, keep only 1–2 plants per mound to reduce overlap and stress on roots.
When and How to Harvest Pumpkins
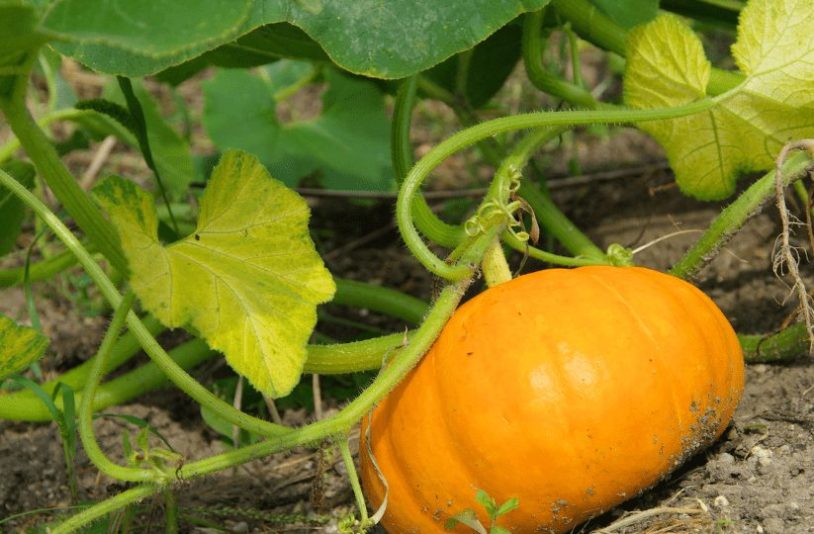
Harvest pumpkins when they turn deep orange, have a hard shell, and their vines start to wither—this ensures they’re ready for picking!
Signs of ripeness
Pumpkins turn a deep, solid color when ripe. The rind feels hard and won’t dent under light pressure from your fingernail. Stems dry out or shrivel near maturity, showing the pumpkin is ready.
Check vines and stems too. They often wither or dry as pumpkins mature. Pick them before heavy frost hits, usually in late September to early October. This helps ensure they remain healthy and last longer in storage.
Best cutting method
Use sharp pruning shears or a knife to cut pumpkins from the vine. Leave 3–4 inches of stem attached to each one. If this length is not possible, make sure the stem is at least 1 inch long.
Never snap stems off; it can reduce storage life.
Wear gloves and long sleeves while handling prickly vines. Avoid lifting by the stem to prevent breakage. Use a clean blade to stop diseases from entering through the cut area. Place each pumpkin gently on a soft surface, such as straw or cloth, to avoid bruising.
Handling tips
Handle pumpkins with care to avoid cuts or bruises. Lift them by their base, not by the stem, which can snap off easily.
Cure freshly harvested pumpkins in sunlight for 10–14 days to harden their skin. Place cardboard or newspaper under ripening ones to prevent ground rot. Store mature, undamaged pumpkins in a dry area between 50°F and 55°F.
Cured pumpkins last up to 2–3 months in storage!
Final Tips
Growing pumpkins can be fun and rewarding. With the right care, your vines will thrive and produce beautiful fruits.
Focus on good soil, enough water, and proper pollination to get the best results.
Soon, you’ll enjoy a great harvest ready for pies or fall decorations! Happy gardening!