Peas are sweet, crisp, and tender. Growing your own peas is one of those simple joys that make gardening feel worth it.
Peas are among the easiest crops to grow, even for beginners. They don’t require fancy tools or a huge backyard. With a bit of planning, decent soil, and the right variety, you can grow peas in garden beds, raised beds, or even containers on a balcony.
Ready to enjoy your own fresh, homegrown peas? Let’s get growing!
Jump to Section [Hide]
Getting to Know Peas
Pea Growth Habits (bush vs. climbing types)
Bush peas grow short, reaching 18–30 inches tall. They are great for small spaces or containers. These types mature quickly and produce pods faster. You can harvest most of their crop all at once.
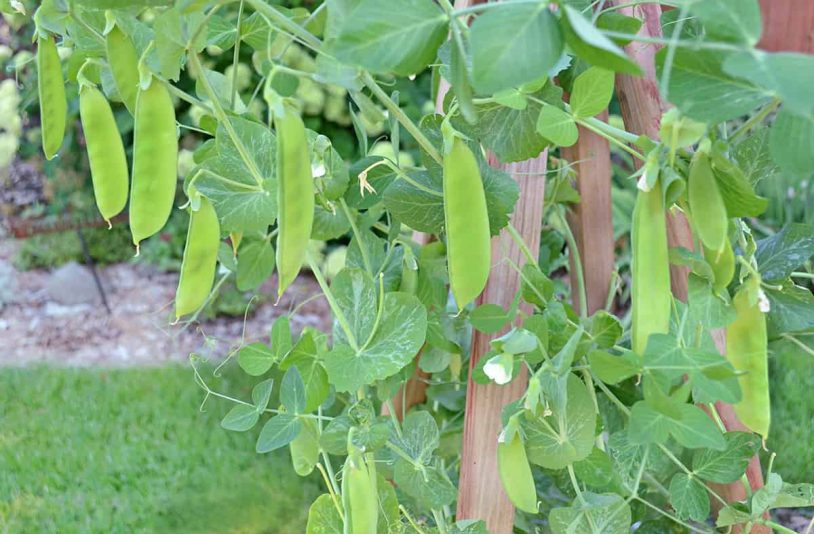
Climbing peas grow much taller, about 4–6 feet high. They require support, such as trellises or netting, to remain upright. Tall varieties give you more pods over a longer time. Both bush and climbing types benefit from some structure to cling to as they grow upward.
Sunlight and Temperature Requirements
Peas need full sun to grow well, but they can also handle part sun. Aim for an area that gets at least 6 hours of sunlight daily. Too much shade slows growth.
They thrive in cool weather with temperatures between 55°F and 65°F. Soil should be warm, around 60°F to 85°F, for seeds to germinate quickly. Germination is slow at 40°F, while plants stop growing above 85°F.
Young pea shoots can tolerate light frost but cannot survive heavy snow or freezing conditions. In warm climates, plant peas in the fall or winter when it’s cooler.
Choosing the Right Pea Variety
Different peas have unique tastes and uses. Pick a type that fits your garden space and cooking needs.
Shelling Peas
Shelling peas are also called English peas or garden peas. They grow inside pods, but only the peas are eaten, not the pods. You should pick them when they’re bright green and before the pods turn waxy.
Early harvest keeps its flavor sweet.
Popular varieties include Green Arrow, Lincoln, and Progress No. 9. These varieties offer mildew resistance and good yields, and taste great fresh or frozen. Thomas Laxton is a favorite if you like sweeter options for cooking or snacks.
Snow Peas
Snow peas are easy to grow and quick to harvest. They’re ready in 60–70 days after planting. These edible pod peas have flat, stringless pods containing tiny, immature seeds. You eat them whole, pod and all.
Harvest snow peas when the pods reach full length but before the seeds swell too much.
Choose varieties based on space and needs. Mammoth Melting Sugar grows tall vines of 4–5 feet with stringless pods. Oregon Sugar Pod II is shorter at 2.5 feet tall, making it good for smaller gardens or containers.
Snowbird resists fusarium wilt, while Dwarf Grey Sugar is another great option for gardeners looking for compact plants with tasty pea shoots.
Sugar Snap Peas
Sugar snap peas are a favorite for their sweet, crisp pods. The classic Sugar Snap variety grows tall and produces plump, glossy pods during a long harvest season. They thrive in well-drained soil with plenty of sunlight.
Some types grow on bushes while others climb. For smaller spaces, the Sugar Ann is only 2 feet tall and requires no support. Early Snap matures about 10–14 days faster than the original Sugar Snap.
Super Sugar Mel stands out with its extra-sweet 4-inch pods. These peas offer vitamin C and iron, but less protein than garden peas! Picking them often helps maintain high yields and healthy plants.
How to Choose the Best Variety
Pick a pea variety based on your needs. Shelling peas are well-suited to drying or freezing, such as the Wando variety. Snow peas have flat, edible pods and are well-suited for stir-fries. Sugar snap peas combine sweetness with crisp pods.
Think about space and plant height before choosing. Bush types stay short at 15 inches, while climbing types reach up to 5 feet and need supports. Look for disease-resistant options to avoid issues such as Fusarium wilt or mildew.
Some varieties even save you time, as they’re stringless or self-supporting!
Planning Where to Grow Peas
Think about the space you have and how peas can fit in. Whether it’s a garden bed or a container, they need room to grow healthy!
Growing Peas in Garden Beds vs. Raised Beds
Raised beds warm up faster in spring. This allows you to plant peas about 4-6 weeks before the last frost. They also drain better in wet weather, helping prevent root rot and fusarium wilt.
In heavy soils, raised beds manage water better while keeping pea roots healthy.
Garden beds work well if prepared with compost or aged manure in the fall. Wide rows help control weeds like grass and make maintenance easier. Space your rows 12–24 inches apart for good airflow around plants.
Use either bed type to grow pisum sativum successfully with proper care of soil and moisture levels!
Growing Peas in Containers
Choose bush varieties for containers, as they remain compact and typically reach 15 inches tall. Use pots with good drainage to avoid waterlogging or root rot. Fill the container with rich soil full of organic matter, keeping the pH between 6.0 and 7.5.
Place seeds about 1–2 inches apart in your pot for a dense but healthy setup. Add small trellises or cages to support vines, even with bush types. Water often since the container soil dries out quickly.
Avoid over-fertilizing peas; too much can harm their growth rather than help it. Monitor moisture and nutrients regularly for better results!
Companion Planting for Peas
Plant peas alongside chives, mint, or alyssum. These plants attract good bugs and keep pests like aphids away. Mint also helps keep the soil cool and moist by providing shade.
Avoid placing onions or garlic near peas, as they can slow growth. Carrots or radishes can be planted in the same row as peas to save space. If you grow climbing pea types, use corn as a natural trellis.
Crop Rotation to Prevent Soil Problems
Don’t plant peas in the same spot every year. Rotate them to a new area at least once every four years. This helps prevent soil diseases like fusarium wilt and pests such as root-knot nematodes.
Avoid planting other legumes, such as beans, after peas. Instead, grow non-legume crops like carrots or spinach next. Pea plants leave nitrogen in the soil, which benefits these crops.
After harvest, incorporate pea plant remains into the soil and wait two weeks before replanting to improve soil health.
Preparing the Soil
Healthy soil sets the stage for strong pea plants—learn how to get it just right.
Ideal Soil Type and Structure for Peas
Peas grow best in loose, well-drained soil. Add compost or organic matter to improve soil structure and retain water without causing sogginess. Avoid using heavy clay unless you amend it with organic matter to improve drainage.
The soil should allow roots to spread easily. This helps shallow-rooted peas thrive while preventing diseases such as root rot. Wide rows reduce compaction and improve water flow.
Mulching can retain soil moisture and reduce weeds around your plants.
Testing Soil pH
Test the soil pH before planting peas. Use a simple soil test kit or send samples to a lab. Peas grow best in slightly acidic to neutral soil, with a pH between 6.0 and 7.5.
If the pH is below 6.0, add lime to raise it to at least 6.0. Lime improves nutrient uptake and may help control fusarium wilt. Test annually if you often grow peas, as conditions can change.
Proper pH supports healthy plants and higher pod yields for snap peas and snow peas.
Adding Compost or Organic Matter
Add aged compost or well-rotted manure to the soil in the fall. Use up to 1 inch of it for every 100 square feet. This boosts soil fertility and helps peas grow strong.
Compost improves soil structure, making it hold water better while draining well. It supports beneficial bacteria that work with pea roots to fix nitrogen. Fresh manure can spread disease, so avoid it.
Adding organic matter also leads to higher yields and better-quality pods.
Ensuring Good Drainage
Peas grow best in well-drained soil. Poor drainage can lead to root rot, weak seedlings, and bad germination rates. Avoid planting peas in low spots where water collects. If your garden has heavy or wet soil, raised beds or mounds help with drainage.
Test how fast water soaks into the ground after rain or watering. If it pools for too long, add organic matter or sand to improve the soil structure. Peas are sensitive during germination and early growth stages.
Keep the area moist but not waterlogged to provide roots with oxygen and prevent diseases such as fusarium wilt.
Planting Peas Step by Step
Planting peas is simple, but it requires the right steps. Follow a clear plan to help seeds grow strong and healthy.
Step 1: Check Soil Temperature and Conditions
Use a soil thermometer to check the temperature. The soil should be between 60°F and 85°F for peas to germinate well. If it’s around 40°F, seeds may sprout slowly or rot before growing.
Make sure the ground is not soggy or waterlogged. Too much water can harm seeds. Wait until the soil is moist but crumbly in your hand. Early spring is often best since peas grow better in cool weather before summer heat arrives.
Step 2: Prepare and Level the Planting Area
Clear the area of weeds, stones, and debris. This reduces competition for nutrients and space.
Loosen the soil with a shovel or garden fork. Add compost or aged manure to improve fertility. Check that the ground is level by raking it smooth. Avoid compacting the soil as you work.
Make sure water drains well to prevent soggy roots later on.
Step 3: Mark Rows and Spacing
Use stakes or string to mark straight rows. For bush peas, keep rows 7 inches apart. Climbing types need more room, especially if you use trellises. Wide planting trenches can work too, spaced 6–7 inches apart.
Sow seeds 2 inches apart in each row. Good spacing promotes airflow and helps prevent diseases such as powdery mildew. Dense planting also blocks weeds from growing between the plants. Properly marked rows make it easier to care for and harvest your garden peas later!
Step 4: Sow Pea Seeds at the Right Depth
Plant pea seeds 1 inch deep. Use a single seed per spot for even growth. Cover them with soil and gently press to ensure good contact. Planting too deeply can stop seeds from sprouting, while planting too shallow risks drying out.
If the soil feels dry, water the furrow before covering the seeds. Keep spacing uniform, about 2 inches apart if using broadcast sowing. Avoid clumps; peas need their space to grow well!
Step 5: Water Gently After Planting
Water the soil lightly to keep it moist without washing away seeds. Use a fine spray or watering can for gentle watering. Avoid splashing as it may disturb the planted pea seeds.
Check the soil daily to ensure it’s not too dry or too wet. Too much water can rot the seeds, while too little slows germination. Focus on watering at the base of your rows, not from above.
Step 6: Label Rows and Monitor Germination
Label rows with the variety name and planting date. Use a stake or small sign for clear identification. This helps track each type of pea planted, like sugar snap peas or snow peas.
It also helps compare their germination rates.
Check daily for signs of sprouting; it usually occurs within 7–14 days if temperatures are right. Look out for pest damage or poor emergence early on. Remove debris that may block seedlings from growing through the soil.
Record any issues or differences between varieties to plan better next time.
Step 7: Install or Check Supports as Seedlings Grow
Set up supports early to help your peas grow strong. Use trellises, cages, or netting right after seedlings appear. Tall pea varieties like climbing types need supports at least 4–6 feet high.
Wooden poles, wire fencing, or mesh work well for this.
Regularly check the stability of your support system. Secure loose parts and adjust as vines grow taller. Tie young plants gently to guides using soft ties or cloth strips. Proper support keeps plants upright and stops them from falling over (lodging).
It also improves air circulation around leaves, helping prevent diseases like powdery mildew.
Caring for Pea Plants
Healthy peas need care to thrive. Water wisely and control weeds for stronger growth.
Proper Watering Techniques
Water peas deeply once a week, soaking the soil to a depth of 1 inch. Use drip irrigation or soaker hoses for steady moisture at the roots.
Avoid wetting leaves, as this can lead to diseases like powdery mildew. Water the base of plants and let the soil dry halfway before watering again. Too much water causes root rot and weak growth, so watch for signs of overwatering.
Mulching to Retain Moisture and Suppress Weeds
Spread 3–4 inches of organic mulch after your pea seedlings grow. Use straw, shredded leaves, or compost for the best results. Mulch keeps soil moist and reduces watering needs. It also stops weeds from growing around your plants.
Mulching keeps soil temperatures steady during cool spring weather. It prevents soil splash onto leaves, reducing disease risks such as powdery mildew. As it breaks down, organic mulch also improves your soil’s structure.
Raised beds and containers benefit greatly from this step!
Using Fertilizers for Better Yield (and when to avoid overfeeding)
Peas need phosphorus and potassium to grow well, but too much nitrogen can hurt them. Nitrogen makes plants leafy and delays flowering and pod development. Use low-nitrogen fertilizers with ratios like 32-3-10 or 27-3-3 to avoid this problem.
Always check your soil first. Compost or aged manure usually provides peas with sufficient nutrients without causing harm.
Avoid overfeeding if the soil already has high phosphorus levels. Excessive fertilizer can damage roots or increase pest populations, such as aphids. Add no more than 1 inch of compost per 100 square feet when planting peas in garden beds or containers.
Pea plants also fix nitrogen naturally through symbiotic bacteria on their roots, so they often don’t need extra help from chemical fertilizers!
Weeding Around Pea Plants Safely
Weeds can compete with your pea plants for water and nutrients. Remove them early, especially in the first six weeks after planting. Hand-pulling is safest around mature pea plants to protect their shallow roots.
Avoid using tools too close to the base of the plant.
Apply organic mulch, such as straw or dried leaves, to suppress weeds and retain soil moisture. Dense rows of bush peas also help by shading out competing weeds naturally. Always weed gently near your plants to avoid root damage.
Managing Pests and Diseases
Pests and diseases love peas too—but with simple tricks, you can keep your plants safe and happy.
Common Pests Affecting Peas (aphids, pea weevils, etc.)
Aphids are tiny pests that suck sap from pea plants. They leave sticky honeydew on leaves, which attracts ants and can cause yellowing or curling. You might also spot green or pink pea aphids causing stunted growth.
Severe aphid infestations may require removing affected plants.
Pea weevils are small brown beetles with snouts. They damage pods by laying eggs inside them. Handpick adult weevils for control, or plant your peas early to avoid them. Army worms and cutworms chew seedlings and leaves, while wireworms attack roots, leaving plants hollow and weak.
Mexican bean beetles eat leaves until only veins remain, creating a “skeleton” look. Check often for these pests to protect your crop!
Natural and Organic Pest Control Methods
Place chives or mint near your peas to keep aphids away. Sprinkle garlic powder or pepper around the plants to repel pests. Banana or orange peels work well, too, for keeping bugs off.
Spray insecticidal soap to control aphids safely. Use a strong stream of water to knock them off the leaves. Pick pea weevils and Mexican bean beetles by hand if you see them. Let beneficial wasps handle the bigger pest problem, as they target beetles naturally.
Cover seedlings with row covers to prevent insect damage early and protect them from frost damage.
Common Diseases in Peas (powdery mildew, root rot, etc.)
Powdery mildew appears as a white powder on leaves. It causes yellowing and twisted growth. Downy mildew shows up as yellow spots with cotton-like fuzz. It spreads fast in wet weather.
Fusarium wilt turns stems brown and plants limp. Root rot stunts growth, especially in soggy soil.
White mold creates fluffy patches on pods and thrives in crowded areas. The Pea Enation Mosaic virus causes mottled leaves and smaller plants, often spread by aphids or other pests.
High moisture levels exacerbate root diseases. Rotate crops each year to stop these problems from spreading further!
Preventive Care and Good Garden Hygiene
Clean up plant debris regularly. Remove old pea plants, weeds, and leaves. This helps prevent pests and diseases from affecting your garden peas.
Check plants regularly for issues such as aphids or powdery mildew. Healthy soil helps prevent problems as well. Add compost to enrich the dirt and keep it well-drained. Proper airflow between rows reduces the risk of mold on pea shoots and pods.
Troubleshooting Common Pea Problems
Struggling pea plants can frustrate you, but many problems have simple fixes. Learn quick tips to handle issues like weak growth or pests—your peas will thank you!
Poor Germination
Pea seeds struggle to germinate in soil colder than 40°F. Use a soil thermometer to check before planting. Soak the seeds overnight in water to boost their chances of sprouting. Waterlogged or poorly drained soil can drown the seeds, so use well-drained soil mixed with compost.
Planting seeds at the wrong depth causes problems, too. Keep them around 1 inch deep for better results. Birds and mice love eating pea seeds, so cover your planting area with netting if needed.
Uneven watering or sudden weather changes also stress the seedlings and slow growth. Check moisture levels regularly and protect young plants from harsh conditions to improve germination rates.
Yellowing Leaves
Yellowing leaves often mean trouble. Heat stress can cause this, especially in temperatures above 80°F. Make sure your peas receive about 1 inch of water per week to prevent dryness that harms the plants.
Poor soil drainage may also lead to yellowing and weak roots.
Aphids might be another problem, leaving sticky residue on curled leaves. Check for pests and use natural enemies like ladybugs or organic insecticides to control them. Diseases such as fusarium wilt or downy mildew may also present as wilting or yellow spots.
Maintain good airflow around plants and avoid overusing nitrogen fertilizer to promote healthy growth.
Weak or Leggy Growth
Pea plants need full sun to grow strong. If they don’t get enough sunlight, they can become weak and leggy. Ensure your garden spot receives at least six hours of direct sunlight daily.
Cold soil below 60°F slows growth and causes weak stems. Wait until the soil warms before planting your peas. Overwatering also hurts them by causing root rot, so water lightly but regularly.
Keep seeds spaced 2 inches apart to avoid overcrowding that leads to competition for nutrients and weak vines. Use trellises or supports early on to help pea plants grow taller and stronger vertically.
Few Flowers or Pods
Too much heat or dry soil can cause pea flowers to fall off. Temperatures above 80°F make this worse. Keep the soil moist to help flowers stay on and pods form.
Adding too much nitrogen delays flowering and reduces pod production. Use balanced fertilizers instead of high-nitrogen ones for better results.
Peas Not Filling Out Properly
Peas may not fill out if the soil is too cold. Aim for soil around 40°F at planting time. High heat, over 80°F, can stress plants and cause flowers to drop. This leads to small or empty pods.
Lack of water also affects pea pods. Ensure they receive approximately 1 inch of water per week. Overfeeding with nitrogen-rich fertilizer can harm pod development by boosting leaf growth instead of peas.
Regular harvesting helps prevent mature pods from remaining on the plant too long, which prevents proper filling.
Harvesting Peas
Harvesting peas is exciting and rewarding. Picking them the right way keeps your plants healthy and productive!
How to Tell When Different Types of Peas Are Ready
Snow peas are ready when the pods are flat, and the seeds inside are small. Pick them before they become overfull for better flavor. Snap peas should be harvested when the pods feel firm but still glossy.
Avoid waiting until they lose their shine.
For shelling peas such as garden or English peas, select pods that look full and plump. Check daily after flowering to avoid overripe, hard pods. Overmature ones will turn dull or waxy, losing taste and texture quickly.
Best Time of Day to Harvest
Pick peas early in the morning after the dew dries. The cooler air helps keep them crisp and fresh.
Avoid midday harvesting. Heat can wilt peas quickly, reducing their quality.
How to Harvest Properly Without Damaging Plants
Hold the vine with one hand while pulling pods using your other hand. This keeps the plant safe from damage. Snap peas should be taken early, before the seeds grow too big. If left too long, pods get tough.
Harvest in the morning, after the dew has dried, for better taste. Pick often to keep plants growing more peas. Keep soil moisture steady to avoid stringy pods. After harvest, remove trellises and add leftover plant parts into the soil to boost fertility.
How Often to Pick for Continuous Production
Pick peas daily once the pods are filled. This keeps them sweet and tender. Regular harvesting helps plants produce more pods, providing a steady supply.
Snow peas should be picked when the seeds inside are still small. Snap peas often produce for a long time with just one planting. Use both hands when picking to avoid damaging plants and to make harvesting easier.
Storing and Using Harvested Peas
Fresh peas spoil quickly if left out. Store them properly to preserve their flavor and texture.
Short-Term Storage Tips (refrigeration and handling)
Place peas in paper bags and wrap them with plastic to keep them fresh. Store them in the refrigerator to preserve flavor and crispness. Eat within 5 days for the best taste.
Shell the peas immediately after picking, or chill them in ice water if you need more time. Snap peas are sweetest 5-8 days after flowers bloom, so harvest and refrigerate quickly.
Pea Preservation Methods (freezing, drying, canning)
Freeze freshly shelled green peas to keep them long-term. First, blanch the peas in boiling water for 1-2 minutes. Cool them quickly in ice water, then dry and pack into airtight containers or freezer bags.
Snow pea pods and sugar snap peas require their strings to be removed before blanching.
Dry peas, like field peas, should stay on the plant until their pods turn yellow and dry. Once harvested, shell them, remove any debris, and store them in sealed glass jars or plastic containers.
For canning garden peas or English peas, follow safe home-canning directions using a pressure canner to prevent spoilage. Properly stored, frozen or dried peas last for months; canned peas last up to a year if sealed tightly.
Simple Ways to Use Fresh Peas in the Kitchen
Toss fresh peas into salads for a sweet, crunchy bite. They pair well with greens, strawberries, and even crumbled goat cheese.
Add them to pasta dishes for color and texture. Mix peas with creamy sauces or sprinkle them on top of warm spaghetti for a pop of flavor.
Stir fresh peas into soups to enhance taste. They work great in vegetable broth or chicken noodle soup for extra sweetness.
Use them in stir-fries alongside snap beans, carrots, or bell peppers. Their bright green color makes dishes look lively and delicious!
Benefits of Growing Peas
Pea plants enrich the soil by fixing nitrogen. This reduces the need for nitrogen fertilizers in your garden. Their quick growth means you can harvest them in just 60 to 70 days. Homegrown peas taste better, too; they are sweeter and less starchy than store-bought ones.
Peas are packed with protein, fiber, and iron, making them a healthy choice for meals. You can eat their pods, shoots, and vines, adding variety to recipes. After harvesting, use pea plants as green manure to further improve soil health.
They also extend your gardening season with early spring or late fall harvests.
Final Tips
Growing peas is simple and fun. You just need good soil, sunlight, and a little care. Pick the right pea type for your needs and space. Harvest often to enjoy sweet, fresh peas straight from your garden.
Start planting now, and you’ll soon have tasty results!