Cleaning your toilet tank might not seem important, but it affects how well your toilet works. Over time, grime, rust stains, and mineral deposits build up inside. These can cause odors or damage to parts like the fill and flush valves.
Cleaning your toilet tank twice a year helps prevent problems. It keeps things running smoothly and stops bacteria or mold from growing. Even hard water deposits can be handled with simple tools like vinegar and baking soda.
In this post, you’ll learn how to clean a toilet bowl tank step by step. You’ll also find tips for removing tough stains and preventing future buildup. Keep reading… It’s easier than you think!
Jump to Section [Hide]
- Why Cleaning Your Toilet Tank Matters
- Tools and Materials You’ll Need
- Safety First: Pre-Cleaning Preparations
- Step-by-Step Guide: How to Clean a Toilet Tank
- Removing Tough Stains and Hard Water Deposits
- Preventing Future Buildup and Odors
- Establishing a Routine: Regular Toilet Tank Maintenance
- Common Mistakes to Avoid
Why Cleaning Your Toilet Tank Matters
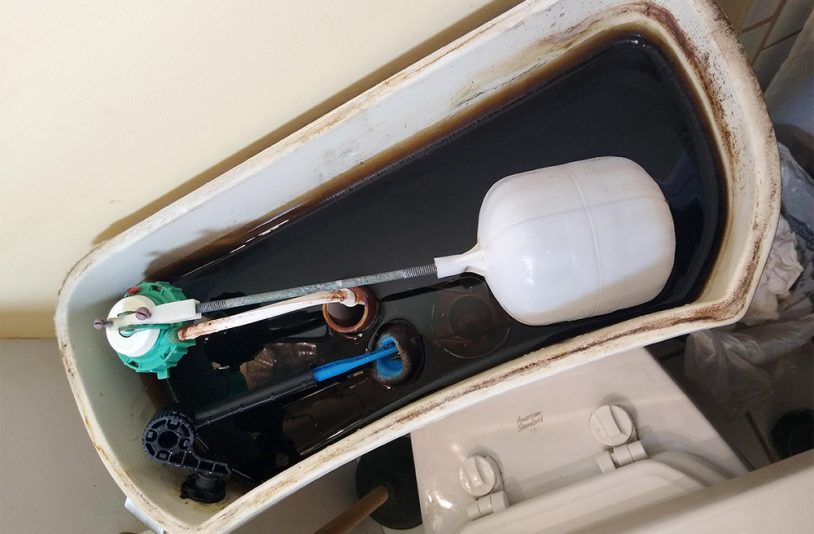
A dirty toilet tank can lead to grime, rust, and mineral buildup. This can affect the toilet’s performance and cause leaks or damage to flapper valves. Mold and mildew thrive in humid conditions, creating foul smells and hygiene issues.
Deposits form faster in hard water areas. They may clog parts or stain the tank walls. Cleaning every three months in such places or once a month for humid environments keeps your bathroom fresh and functional.
Regular care also helps prevent problems with septic tanks over time.
Tools and Materials You’ll Need
Gather a few cleaning supplies to make the task easier. Choose items that suit your preferences, like natural or store-bought options.
Cleaning solutions (store-bought or natural)
Choose a cleaner that is safe for your toilet tank. Store-bought options, like sulfamic acid or hypochlorite cleaners, work well. They clean grime and kill bacteria. Pick one labeled safe for plastic and metal parts to avoid damage.
Natural solutions are also gentle and effective. Use up to 3 gallons of white vinegar and baking soda if needed. These remove stains and odors without harsh chemicals. Mix them in the tank water for a chemical-free clean-up!
Scrub brush or sponge
A plastic-bristle scrub brush works best for cleaning a toilet tank. It can reach tight spots and remove grime without scratching surfaces or wood finishes.
Use a sponge for gentle scrubbing or wiping areas the brush might miss. Keep both tools separate from other bathroom cleaning supplies to avoid spreading germs.
Gloves, goggles, and other protective gear
Wear rubber gloves to protect your skin from chemicals and germs. Safety goggles shield your eyes from splashes of water or cleaning products.
Choose a gear that fits well and is comfortable during cleaning. These items reduce risks when handling bleach, sulfamic acid, or other solutions.
Vinegar, baking soda, or bleach (optional)
Use white vinegar to clean the tank. It is natural and safe for most tanks. Pour 2 to 3 gallons of it directly into the empty tank. Let it sit for at least an hour before scrubbing.
Baking soda works well with vinegar. Sprinkle some in after adding the vinegar. This helps remove grime and odors better. Avoid using full-strength chlorine bleach as it may damage parts inside your toilet tank over time.
Safety First: Pre-Cleaning Preparations
Wear rubber gloves to protect your hands. Put on safety goggles to shield your eyes from splashes. Turn the water valve clockwise to shut off the water supply. Open windows or turn on a fan for proper ventilation.
Keep cleaning solutions away from kids and pets. Check labels if you use chemical cleaners like bleach or sulfamic acid. Before starting, place all tools, like scrub brushes and sponges, within easy reach.
Step-by-Step Guide: How to Clean a Toilet Tank
Cleaning your toilet tank doesn’t have to be hard; it’s all about following the proper steps. With a few tools and a little time, you’ll have it looking fresh again.
Step 1: Turn Off the Water Supply
Turn the water valve clockwise. This stops the flow of water to your toilet tank.
Flush the toilet to check if the water supply is entirely off. If no water refills, you’re ready to start cleaning.
Step 2: Flush and Empty the Tank
Shut off the toilet’s water supply. Push the flush lever to drain most of the tank water.
Use a sponge to soak up any leftover water at the bottom. Ensure the tank is empty before cleaning.
Step 3: Add Cleaning Solution and Let It Soak
Pour white vinegar into the tank, filling it to about 1 inch below the rim. Wear gloves for protection while doing this.
Let the vinegar sit in the tank for 12 hours. This helps break down tough stains and hard water deposits. It also kills bacteria like Serratia marcescens.
Step 4: Scrub the Tank Interior Thoroughly
Wear gloves before scrubbing. Use a plastic-bristle brush to clean the inside of the tank. Focus on areas with rust or mineral buildup. Scrub gently but firmly to remove grime.
For stubborn spots, use vinegar or baking soda for extra cleaning power. Avoid metal brushes that may damage surfaces. Clean every corner for the best results.
Step 5: Clean and Inspect Tank Components
Check the fill valve and flush valve carefully. The fill valve controls water flow. Wipe it with a damp cloth to remove grime. Use a sponge or soft brush to clean the flush valve, which releases water into the bowl.
Inspect these parts for cracks, rust, or buildup. Replace any damaged pieces right away to keep your toilet working well. This step prevents leaks and ensures smoother operation over time.
Step 6: Rinse and Refill the Tank
Turn the water valve counterclockwise to let water flow back into the tank. Flush several times to rinse out any leftover vinegar or cleaning solution.
Keep an eye on how fast the tank refills. During this step, check for leaks or unusual noises. Once full, your toilet tank is clean and ready to use.
Removing Tough Stains and Hard Water Deposits
Use a pumice stone to scrub hard water deposits. Keep the surface wet while scrubbing to avoid scratches. This tool is excellent for breaking down buildup without damage.
For rust stains, mix vinegar and baking soda into a paste. Apply it to the stain and wait for one hour. Then, scrub gently with a sponge or brush until clean.
Preventing Future Buildup and Odors
If you have hard water, install a water softener. This helps reduce mineral deposits inside the tank, keeping parts cleaner. Softer water also prevents foul smells caused by buildup.
Drop bleach-free toilet tank tablets into the tank regularly. These can be cleaned gently without damaging internal components. Stick to a cleaning schedule, like once every 3 months, to stop grime and odors before they start.
Establishing a Routine: Regular Toilet Tank Maintenance
Clean your toilet tank at least twice a year. If you have hard water, do this every three months to avoid mineral buildup. Monthly cleaning works best in humid places with high mold risk.
Use bleach-free tablets or water softeners to reduce odors and stains between cleanings. Check for rust, cracks, or loose parts each time you clean the tank. Regular maintenance keeps it working well and prevents costly repairs later!
Common Mistakes to Avoid
Avoid using full-strength chlorine bleach. It can harm the parts inside your toilet tank. If you must use bleach, dilute it with water.
Don’t mix bleach with vinegar or other acids. This creates toxic fumes that can be dangerous to breathe in. Also, rinse thoroughly after cleaning to stop residue from building up over time.
The Bottom Line
Cleaning your toilet tank is simple and worth the effort. It helps keep your bathroom fresh, prevents damage, and improves flushing. Basic tools like vinegar, gloves, and a brush make it easy.
A clean tank prevents odors and buildup before they start. For better results, make cleaning it twice a year part of your routine.