A dirty bathroom fan can cause problems. It may spread dust, lower air quality, or allow mold to grow. Worse, it might stop working when you need it most. Cleaning your bathroom exhaust fan helps avoid these issues.
A clean fan improves airflow and keeps moisture away. This guide will show you how to clean a bathroom fan step by step.
Ready to start? Keep reading!
Jump to Section [Hide]
Safety First: Preparing for the Task
Turn off the power. Flip the breaker or switch to stop electricity from flowing to your bathroom fan. This keeps you safe while working. If your fan has a light, disconnect its wires before cleaning.
Use a sturdy step ladder to reach high areas like the fan housing. Keep tools handy but away from edges to avoid accidents. Wear gloves and safety glasses to protect your hands and eyes from dust or sharp parts while handling screws or fan parts.
Tools and Materials You’ll Need
You need a few items to clean your bathroom fan properly. Gather common tools and cleaning supplies for the job.
Screwdriver
A screwdriver helps remove screws from the fan cover. You only need a basic one for this job, which costs less than $20. Use a flathead or Phillips-head screwdriver based on the type of screws your bathroom fan has.
Keep it within reach while cleaning. It makes removing and reattaching parts quick and simple. Without it, removing the fan becomes harder and may damage components if you force them open.
Vacuum Cleaner with Brush Attachment or Compressed Air
Use a vacuum with a brush attachment to clean dust and debris off the fan blades and housing. The brush helps reach tricky corners and removes dust buildup without scratching surfaces.
Vacuuming improves airflow by keeping dirt out of your bathroom ventilation.
Compressed air works well when cleaning the motor. Spray short bursts into tight spaces to blow out hidden dust accumulation. This prevents fan noise caused by clogged parts while maintaining indoor air quality.
Mild Detergent and Warm Water
Mix mild detergent with warm water in a small bucket or bowl. Use this solution to clean the fan cover, especially non-lighted.
Soak the vent cover for 10-15 minutes to loosen dirt and mildew. Scrub gently with a soft cloth or brush to remove all grime. Rinse thoroughly and let it dry before reinstalling.
Soft Cloth, Microfiber Cloth, or Soft Brush
Use a damp microfiber cloth to wipe dust from the fan blades and housing. It grabs dirt better than regular fabrics. A soft-bristle brush works great for scrubbing crevices or hard-to-reach parts without causing damage.
Avoid harsh materials that might scratch the surface. Use gentle, circular motions to prevent fan motor issues or added wear while cleaning. Keep your tools clean between uses to avoid spreading grime.
Step Ladder
A step ladder lets you safely reach the bathroom fan and work comfortably. Choose one sturdy, stable, and tall enough for your ceiling. It should have non-slip feet to prevent sliding on tile or slippery floors.
Place it near the fan but not close to walls or other obstacles. Always ensure it’s on level ground before climbing. Use both hands when stepping up or down. Your safety comes first!
Optional: Lubricant for Fan Motor
Most modern bathroom fans don’t need lubricant. Their motors are sealed and built to work without it.
Check the fan manufacturer’s guide before using any lubricant. Apply a small amount of lightweight oil, like 3-in-1 oil. This can help reduce noise or improve airflow in older models with exposed parts.
Avoid over-lubricating it may attract dust and cause mold growth inside the fan housing.
Step-by-Step Guide to Cleaning a Bathroom Fan
Cleaning your bathroom fan is easier than you think. Follow these steps, and you’ll have it working like new in no time!
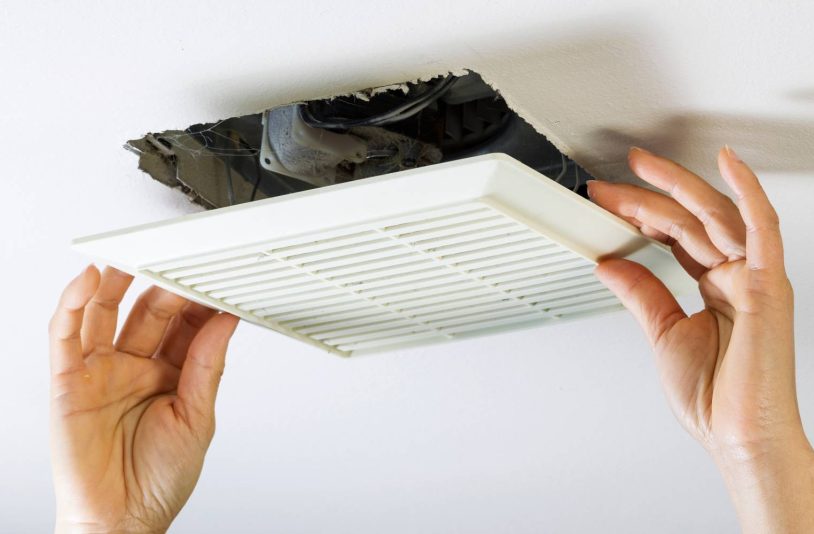
Step 1: Remove the Fan Cover
Turn off the power to the bathroom fan. Use a step ladder to reach the fan cover.
Gently pull down on the edges of the cover. If it’s lit, handle wires with care. Squeeze or press the clips on each side to thoroughly remove them.
Step 2: Clean the Fan Cover
Soak non-lighted fan covers in warm water mixed with mild detergent. Let them sit for 10–15 minutes to loosen dirt and grime. Use a soft brush or cloth to scrub off any stains. Rinse it well, then dry it thoroughly.
For lighted covers, avoid soaking. Instead, use a vacuum with a brush attachment to remove dust gently. After vacuuming, wipe the surface using a damp microfiber cloth. Ensure all parts are clean before moving on.
Step 3: Vacuum and Dust the Fan Blades and Housing
Use a vacuum with a brush attachment to suck up dust from the fan blades and housing. Hold the vacuum steady but gently to avoid damage. If you have compressed air, blow away dirt stuck in tight spots.
Wipe down any leftover grime with a microfiber cloth or soft brush. Do not remove or touch the motor while cleaning. This keeps it safe and prevents issues later.
Step 4: Deep Clean the Motor (If Applicable)
Turn off the fan’s power. Check if the motor needs cleaning. This is key for long-term use. Use a vacuum cleaner with a brush or compressed air to gently remove dust and dirt from the motor.
Wipe all visible parts with a microfiber cloth dampened in mild detergent and warm water. Let it dry thoroughly before reinstalling it into the housing. This step helps avoid fan damage over time, ensuring smooth performance.
Step 5: Clean the Surrounding Area and Duct Opening
Wipe dust around the fan housing with a soft cloth. Check for mold near the edges and clean it using mild detergent. This keeps your bathroom fresh and prevents buildup.
Inspect the duct opening for blockages. Use a vacuum or compressed air to clear debris from the ductwork. Clean ducts reduce stress on the fan motor, improving airflow efficiency.
Step 6: Reassemble and Reinstall the Fan Components
Reattach the fan motor securely using the screws you removed earlier. Tighten them properly to prevent any noise or shaking later. If wires were unplugged, reconnect them carefully by matching their original positions.
Place the clean fan cover back in its spot and snap or screw it into place. Make sure it fits snugly to avoid gaps that can trap dust. Double-check that all parts are secure before proceeding.
Step 7: Restore Power and Test the Fan
Turn the power back on at your circuit breaker. Then, flip the bathroom fan switch to test whether it works.
Listen for smooth operation and check airflow. Inspect for loose parts or remaining dust if the fan is loud or weak.
Troubleshooting Common Bathroom Fan Issues
Sometimes, even after cleaning, your fan may still have problems. Learn how to fix common issues like noise or poor airflow with simple steps!
Fan Making Noise After Cleaning
A noisy fan after cleaning could mean loose parts or dirt in the motor. Check if the blades or cover are tightly secured. If needed, tighten screws with a screwdriver. Dust trapped inside might also cause issues. Use compressed air to clear it out.
Install felt pads or silicone caulk around the edges to reduce vibration noise. If the sound continues, inspect the motor for wear. If your fan’s manual allows it, apply lubricant sparingly, as this can smooth operation and lower noise levels.
Fan Not Turning On
Check if the fan is fully reassembled. A loose cover or misplaced screws can prevent it from working. Verify that all parts, including the motor and blades, are securely attached.
Make sure power is restored correctly. Inspect the switch and breaker to confirm they are on. If everything looks OK but you still haven’t had luck, you might need a professional to inspect for deeper issues like motor damage or wiring problems.
Poor Airflow Despite Cleaning
Poor airflow may occur even after cleaning. Check the fan’s cubic feet per minute (CFM) rating. Use an anemometer to measure airflow. Compare readings to ensure the airflow matches the fan’s specifications.
Blocked ductwork often reduces performance. Dirt, mold, or debris might clog vents or ducts. Look for bends or cracks in the ducts that block air. Clean and repair them if needed for better ventilation.
How to Maintain Your Bathroom Fan
Keep your bathroom fan running smoothly by cleaning it often and checking for damage. It’s easier than you think!
Regular Cleaning Schedule
Clean your bathroom fan every six months. This keeps it working well and helps prevent mold. If it is used daily, aim to clean it once a year for the main bathrooms.
Dust and dirt build up quickly in fans. This simple schedule avoids problems like poor airflow or fan damage.
Inspect for Damage and Wear
Check the fan for unusual noises. Loose parts can cause strange sounds. Tighten any screws or bolts if needed. Look at the fan blades, do they wobble? A wobbly blade might mean wear or damage.
Inspect the ducts for blockages, like dust clumps or debris buildup. Blocked ducts reduce airflow and can harm your fan over time. If you see cracks or rust on metal components, it could signal bigger issues ahead.
Early fixes save money and keep your bathroom fan working well!
Keep the Ductwork Clean
Dirty ducts stop airflow and make the fan work harder. Check for blockages like dust, lint, or bird nests. Use a vacuum with a brush attachment to clean inside the duct opening. Compressed air can help push out deeper debris.
Clear space around the fan’s vent outside your home. Trim plants or remove objects that block airflow. Clean ducts once or twice a year for better performance and less wear on the motor.
Reduce Dust and Moisture Buildup
Clean your bathroom fan often to stop dust and hair buildup. This keeps odors away and helps the fan work better. Use a vacuum with a brush or compressed air to remove dirt from the blades and cover.
Check for blockages in the ductwork, too. A clogged vent reduces airflow, allowing moisture to linger. Proper cleaning ensures good ventilation and lowers the risk of mold caused by trapped humidity.
When to Replace Your Bathroom Fan
If your fan struggles to remove moisture or makes loud noises, it may be time for a new one. Older fans can also use more energy, so upgrading might save money in the long run!
Signs Your Fan Needs Replacement
Loud noises while the fan runs indicate trouble. A damaged motor or worn-out parts can cause this. Cleaning might help, but it doesn’t always fix the issue. If the noise stays loud, replacement could be better.
Another clear warning is a fan that stops working completely. Even after cleaning and checking for debris, some fans won’t turn on again. Older models often fail like this when motors burn out or wires wear down.
Choosing the Right Replacement Fan
Check the fan’s CFM rating. It shows how much air the fan can move. Choose a fan with the correct CFM for your bathroom size. A small bathroom needs about 50 CFM, while larger ones may need up to 110 or more.
If you’re unsure, use an anemometer to measure airflow. If noise bothers you, pick a quiet model and look for a low sound rating on the box. Make sure it fits your space and wiring setup before buying!
The Bottom Line
Cleaning your bathroom fan doesn’t have to be complicated. With a few tools and some time, you can keep it working well. A clean fan improves air quality and helps prevent mold or damage.
For the best results, stick to regular cleaning every six months. Always pay attention to signs of wear or strange noises after cleaning. If issues persist, it might be time for a replacement fan.
Take small steps now, your home will thank you later! Enjoy fresher, cleaner air in your space today!


