Growing your own tomatoes is a rewarding experience, especially when they are picked fresh from your backyard or balcony. Tomatoes are actually easy to grow once you know the basics.
In this guide, we’ll walk you through everything you need to know, from picking the right variety to harvesting ripe, delicious fruit. No green thumb required, just a little sunlight, water, and patience!
Jump to Section [Hide]
- Choosing the Right Tomato Variety
- Starting Tomatoes: Seeds vs Seedlings
- Planning Your Tomato Growing Season
- Preparing the Growing Site
- How to Plant Tomatoes
- Supporting Tomato Plants
- Watering and Mulching Techniques
- Fertilizing for Healthy Growth
- Pruning and Maintenance Tips
- Pest and Disease Management
- Harvesting Tomatoes
- Saving Seeds for Future Planting
- Extending the Tomato Season
- Troubleshooting Common Problems
Choosing the Right Tomato Variety
Selecting the right tomato type can make a significant difference in your garden. Select varieties that match your climate and growing conditions to increase your success.
Determining the best type for your climate
Select tomato varieties that are suited to the weather conditions in your area. In USDA Zone 10, plant in fall or winter due to mild temperatures. Cooler zones, such as 5b, may require planting in late spring or even June to avoid frost damage.
If you live in a hot region where summer temperatures exceed 86°F, consider selecting heat-tolerant varieties such as Homestead or German Johnson.
Partial shade can help tomatoes thrive if your area gets intense sun, especially in zones 7 and higher. For ideal fruit set, aim for daytime temperatures of 70–80°F and nighttime temperatures around 60–70°F.
Rotate crops every three to four years to prevent diseases such as Fusarium wilt and Verticillium wilt from previous plantings.
Heirloom vs. hybrid tomatoes
Heirloom tomatoes are loved for their rich flavor and variety. Examples such as Cherokee Purple, German Johnson, and Mr. Stripey stand out for taste and beauty but may have variable yields.
These varieties are open-pollinated, meaning you can save seeds to grow true-to-type plants next season.
Hybrid tomatoes offer disease resistance and durability. Varieties like Parks Whopper VF1F2NT often resist common issues such as Fusarium wilt and Tobacco mosaic virus, as indicated by codes like V or T on labels.
They also handle cracking better than heirlooms. While hybrids provide consistency, they don’t allow seed saving because their genetics don’t remain stable across generations.
Determinate vs. indeterminate varieties
Determinate tomato plants grow 1 to 5 feet tall. They set all of their fruit at once, making them perfect for canning or quick harvests. Roma VF is a significant determinant example. These compact plants are well-suited for use in containers or small gardens.
Avoid pruning them, as it can lower your yield.
Indeterminate tomatoes continue to grow and produce until frost hits. Varieties such as Brandywine and Amish Paste thrive with regular care and the pruning of suckers. These plants require sturdy support, such as stakes, cages, or trellises, due to their height of 5 to 8 feet.
Space them at least 3 feet apart to allow efficient air circulation between the vines.
Starting Tomatoes: Seeds vs. Seedlings
Starting with seeds gives you more variety, while seedlings offer a head start—choose what fits your gardening style!
Benefits and challenges of growing from seeds
Growing tomatoes from seeds can be a cost-effective way to save money. A single packet of approximately 75 seeds costs only $3, making it a budget-friendly option for extensive gardens. Seeds also give you access to rare varieties not found in stores, like unique heirloom tomatoes.
Plus, by growing your own, you support self-sufficiency and sustainability.
It requires effort and proper supplies. You need indoor space with good light and seed-starting materials. Seeds must be planted indoors about six weeks before the last frost date in your area.
Once seedlings have grown, they should be hardened off to acclimate to outdoor conditions before being planted in soil or raised beds.
When to start seeds indoors
Start tomato seeds indoors about six weeks before the last expected frost date in your area. Use a light, fluffy seed-starting mix instead of garden soil for improved germination. Plant each seed at a depth of 0.5 inches and maintain a soil temperature of 70°F for optimal results. Germination can occur as low as 55°F.
Once seedlings sprout, place them in a bright location or under grow lights to ensure strong growth. Begin hardening off seedlings one week before transplanting them outside. Transplant when they are 6–8 weeks old and nighttime temperatures stay above mid-50s°F.
Choosing healthy seedlings from the store
Pick short, sturdy seedlings with dark green leaves. Avoid plants with yellow or black spots. Check the roots to ensure they are healthy and not tightly packed (pot-bound). Skip seedlings that look leggy or are already blooming, as they may not grow well.
Ensure the plants have been hardened off before purchasing them. Look for disease resistance codes, such as VFN, on hybrid tomato varieties. Avoid any plants showing signs of pest or disease infestation.
Shopping at local farmers’ markets often gives you better options for healthy tomato seedlings.
Planning Your Tomato Growing Season
Check your local frost dates early. Start planning your garden space and planting schedule based on your area’s climate.
Best time to plant tomatoes
Plant tomatoes outdoors two weeks after the last frost. Ensure soil temperatures stay above 60°F, as frost can damage young plants. For USDA Zone 10, start planting in fall or winter when conditions are mild and warm.
In colder areas, such as zone 5b, wait until mid-June to avoid any lingering frost risks.
Transplant seedlings only when nighttime temperatures consistently remain above the mid-50s°F. If you’re sowing seeds directly into the ground, check that the soil has reached at least 55°F for germination.
Tomatoes require approximately 60 frost-free days to mature fully, so timing your planting is crucial for a healthy harvest.
Understanding your growing zone
Your garden’s success relies on understanding your growing zone. The USDA Plant Hardiness Zone Map helps you determine the first and last frost dates for your area. For example, in zone 5b, frost may persist until mid-June.
In Zone 7, the last frost typically occurs around May 23. If you’re in zone 10, tomatoes thrive when planted in the fall or winter.
Choose varieties suited to your climate. Cherry tomatoes, such as Chocolate Cherry, are ideal for cooler climates because they ripen quickly. Warmer zones can grow larger heirloom varieties without concerns about short seasons or frost risks.
Check with local extension offices for region-specific advice and conditions.
Frost dates and how they affect planting
Frost dates are crucial for determining the optimal time for planting tomatoes. Planting before the last frost can harm young plants, as tomatoes are particularly susceptible to cold temperatures. In some areas, this date is as late as mid-June.
Use resources such as your local Extension office to obtain accurate frost dates for your zone.
Wait at least two weeks after the last frost date before transplanting seedlings outdoors. Soil temperature also matters; ensure it’s 60°F or warmer to prevent cold stress and stunted growth.
Hardening off seedlings helps them better adapt to outdoor conditions as temperatures change.
Preparing the Growing Site
Pick a sunny spot with well-draining soil for your tomatoes. Enhance the area by incorporating rich compost and organic matter to boost nutrient levels.
Choosing a sunny, well-drained location
Tomato plants need full sun for at least 6 hours each day. In northern regions, aim for 8 to 10 hours of sunlight to ensure fruit development. Southern gardeners can provide some afternoon shade if temperatures get too high.
Good drainage is just as important as sunlight. Avoid planting in low-lying areas where water accumulates, as this can lead to root rot and fungal diseases. Avoid places near trees or buildings that cast shade during the day.
If tomatoes have grown there in the past three years, switch locations to prevent soil-borne diseases such as Fusarium wilt or Verticillium wilt.
Improving soil with compost and amendments
Work 2–3 inches of compost into the top 6–9 inches of soil before planting. This adds organic matter, increasing nutrient availability and improving drainage. Add aged manure or compost at least two weeks before planting to allow time for proper breakdown.
If your soil is heavy clay or sandy, amend it to improve structure and fertility. Use bone meal or a slow-release fertilizer in the planting holes for strong root growth. Test your soil’s pH first; tomatoes prefer a pH range of 6.0 to 6.8.
After planting, apply straw mulch or compost to retain moisture and reduce disease risk. Avoid high-nitrogen fertilizers, as they can encourage excessive leaf growth over fruit production.
Testing and adjusting soil pH for tomatoes
Test your soil pH before planting tomatoes. Tomatoes thrive in soil with a pH of 6.2 to 6.8. Use a testing kit from a garden center or local Extension office for accurate results.
If the pH is too low, add lime to raise it and reduce the risk of blossom-end rot. Follow the test recommendations for proper adjustments. Healthy soil helps roots grow strong and keeps plants resistant to diseases like Fusarium wilt and Verticillium wilt.
How to Plant Tomatoes
Plant your tomatoes deep into the soil to help the roots grow stronger. Give each plant enough space to spread and thrive. Crowding can limit their growth.
Planting in the ground
- Pick a sunny spot with well-drained soil. Dig deep holes, about 8-12 inches apart, and enrich each hole with compost and bone meal.
- Add slow-release fertilizer to give tomato plants a strong start.
- Space your seedlings 2–3 feet apart for better airflow.
- Remove the lower leaves from each seedling.
- Bury the stem up to its first set of leaves to promote a stronger root system.
- Water deeply right after planting.
- Mulch around the base using straw mulch or similar material to retain moisture and reduce weeds.
- Install stakes or cages at this stage to prevent root damage later.
Planting in raised beds or containers
- Use a large container with proper drainage, at least 5 gallons in size and 18–24 inches wide.
- Fill it with well-drained potting mix, not regular garden soil.
- Place the container in full sun to ensure your tomato plants get enough light. For raised beds, use rich soil amended with compost for optimal growth.
- Space each plant according to its variety; determinate tomatoes are ideal for containers, as they tend to stay smaller.
- Water potato plants daily during summer, and consider watering twice a day if the weather is particularly hot.
- Mulch around the base of plants to hold moisture and reduce weeds. Use stakes or cages to support your plants as they grow tall and heavy with fruit.
How deep to plant (burying the stem)
- Bury the tomato seedling deeply, covering the stem up to the first set of leaves. This method helps roots grow along the buried stem, providing the plant with strong support and improved drought resistance.
- Dig a deep hole or a trench for planting. Avoid shallow planting, as it can weaken growth. Only bury healthy stems without visible signs of disease. For tall or leggy seedlings, deep planting helps stabilize them in raised beds or containers.
Spacing requirements for different varieties
- Space tomato plants based on their type. Indeterminate tomatoes require about 3 feet of space between plants. Determinate varieties can be grown closer, about 18–24 inches apart. Larger varieties, such as beefsteak or heirloom, may require more space to ensure proper airflow.
- If using stakes, you can plant slightly closer because the support keeps the vines upright. For caged or unsupported tomatoes, leave at least 3 feet to prevent overcrowding and reduce disease risk.
- In containers, stick to one plant per 5-gallon pot to ensure healthy growth and fruit production.
Supporting Tomato Plants
Vigorous tomato plants require sturdy support to grow upright and remain healthy. Use simple tools, such as stakes or cages, to keep them steady as they grow tall.
Using stakes, cages, or trellises
Install stakes, cages, or trellises early. This prevents disturbing roots later. Use 5– to 6–foot–tall cages for indeterminate tomatoes. They support heavy vines and keep fruits clean off the ground.
Stakes are simple but yield bigger, fewer fruits per plant.
Secure stems with soft ties to avoid damage. Trellises work well in small gardens or tight spaces. They train plants vertically while improving airflow. Supports make watering and harvesting easier, too! For larger areas, consider combining vertical and horizontal systems for optimal results.
Training indeterminate varieties for better airflow
Prune indeterminate tomato plants weekly. Remove most suckers, leaving 1 to 3 main stems. This keeps the plant open and improves airflow. Space each plant at least 3 feet apart to reduce overcrowding.
Better air circulation reduces the risk of diseases such as blight and wilt.
Tie vines to stakes or trellises as they grow taller. Use soft ties and adjust them frequently to prevent stem damage. Trim the lower leaves and fruit near the ground to improve ventilation.
Top the main stem about 4-6 weeks before the first frost to help ripen the fruit faster.
Watering and Mulching Techniques
Water deeply to keep roots strong and healthy. Use straw mulch or other coverings to retain moisture and suppress weeds.
How often to water tomatoes
Give your tomato plants about 1 inch of water once or twice a week. In hot summer months, increase this to 2 inches per week. Always soak the soil to a depth of 6–8 inches each time. Container tomatoes may require daily watering, or even twice daily, in extreme heat.
Avoid letting the soil dry between waterings. This prevents fruit cracking and blossom-end rot. Reduce watering during heavy rains. Early morning is the best time for watering, as it reduces evaporation and lowers the risk of disease.
Use mulch, such as straw, to retain moisture and prevent weeds.
Deep watering vs. shallow watering
Deep watering strengthens your tomato plants. It helps roots grow deep into the soil, making them more drought-resistant. Aim to soak the ground to a depth of 6–8 inches during each session.
Shallow watering only wets the surface, creating weak, shallow roots. This can stress your plants and reduce yields.
Using a soaker hose or drip irrigation makes deep watering easier. Water less often but thoroughly for better results. Deep watering also helps prevent common issues like blossom-end rot and cracked fruit.
Check soil moisture with a finger test or moisture meter before watering again to avoid overwatering tomatoes in raised beds or containers.
Benefits of mulching include retaining moisture and preventing weeds
Mulching keeps the soil moist and reduces the frequency of watering. A 2–4-inch layer of straw or compost mulch helps trap moisture in the ground, protecting roots from drying out.
It also cools the soil, shielding tomato plants from the heat of hot days. Organic mulches slowly break down over time, replenishing the earth with nutrients for healthier growth.
A thick layer of mulch blocks sunlight, stopping weeds from growing around your tomato plants. Fewer weeds mean less competition for nutrients and water. Mulch also prevents soil splash onto leaves during watering or rain, reducing the risk of diseases such as blight.
Please keep mulch a few inches away from plant stems to avoid rot.
Fertilizing for Healthy Growth
Feed your tomatoes the nutrients they crave to thrive. Focus on balanced plant nutrition for strong stems, lush leaves, and juicy fruits.
Choosing the correct type of fertilizer
Pick a fertilizer with more phosphorus and potassium than nitrogen. This balance helps tomatoes develop strong roots and produce a plentiful crop of fruit without producing excessive foliage. An 8-8-8 granular fertilizer works well for both starter and side-dress feeding.
Add compost or bone meal to the planting hole for slow-release nutrients. Bone meal enhances root development and promotes fruiting. Use organic tomato fertilizers if you prefer sustainable gardening methods.
Check the labels to ensure the product is specifically designed for tomatoes. For starters, mix 3–4 tablespoons of liquid fertilizer per gallon of water, using no more than one cup per plant.
Avoid high-nitrogen options to prevent excessive leaf growth at the expense of your harvest!
Feeding schedule (when and how often to fertilize)
Feed your tomatoes with a water-soluble fertilizer every two weeks during the growing season. Wait until plants are established before the first feeding. Avoid fertilizing immediately after transplanting, as young plants require time to establish themselves.
When fruits reach about 1 inch in size, side-dress with 2–3 tablespoons of an 8-8-8 fertilizer. Do this every 4–6 weeks for steady growth. Reduce feeding once fruits begin to ripen to prevent over-fertilization.
Oversee plants for signs of nutrient deficiencies, such as yellowing leaves or slow growth. Follow all label guidelines and avoid over-fertilizing, which can harm your tomato plants.
Organic vs. synthetic options
Organic fertilizers, such as compost and bone meal, release their nutrients slowly. They improve soil health while being safer for pollinators and helpful insects. Straw-based mulches also break down over time, adding nutrients to the soil.
Copper fungicide is another organic option to prevent diseases such as blight.
Synthetic options, such as an 8-8-8 fertilizer, act more quickly but must be used with care. These provide quick boosts of nutrients when plants need them most. Synthetic options can suit tight budgets or schedules, but may not offer the long-term soil benefits that organic possibilities do.
Choose based on your gardening goals and local resources.
Pruning and Maintenance Tips
Trim away extra stems and leaves to help your tomato plants grow stronger and focus on making tasty, healthy fruit.
Removing suckers to encourage better yields
Remove small shoots from indeterminate tomato plants weekly before they exceed 3 inches. These shoots sprout between the main stem and branches. Removing them helps channel more energy into fruit growth rather than extra foliage.
Keep only 1–3 main stems per plant to improve airflow and increase yields. Use clean, sanitized pruners to prevent the spread of diseases such as early blight and fusarium wilt. Larger shoots can be planted in moist soil to grow new tomato plants.
Avoid removing shoots from determinate varieties, as this may reduce yield.
Training vines for upward growth
Tie indeterminate tomatoes to stakes or trellises as they grow. This keeps plants upright and prevents them from breaking. Use soft ties, such as cloth strips or plant clips, to avoid damaging the stems.
Adjust these ties as the vines get taller.
Prune lower leaves and suckers to train the plant upward. This improves air circulation and keeps foliage off the soil, thereby reducing disease risks, such as blight. Topping the main stem 4–6 weeks before frost encourages green tomatoes to ripen for harvest.
Monitoring for signs of stress
Check tomato plants daily for signs of stress. Wilting leaves, yellowing, or curling point to watering issues. Deep watering helps prevent leaf curling and blossom-end rot. Use mulch, such as straw, to retain moisture and reduce weeds.
Prune the lower foliage of indeterminate tomatoes weekly. This improves airflow and reduces diseases such as late blight and fusarium wilt. Companion planting can attract beneficial insects while repelling pests, thereby reducing plant stress even further.
Maintain a balanced soil pH for optimal growth!
Pest and Disease Management
Protect your tomatoes from pests like aphids and hornworms to keep plants healthy. Watch for disease signs early—quick action can save your crop.
Common tomato pests (aphids, hornworms, etc.)
Aphids and hornworms are common pests of tomatoes that can harm your plants. Aphids weaken tomatoes by sucking sap, causing leaves to yellow or wilt. You can spray them off with a strong water jet or use insecticidal soap for control.
Hornworms quickly chew through leaves and stems, leaving visible holes. Hand-pick these large green caterpillars in the morning or evening when they’re most active.
Watch for early signs of infestations to protect your crop from damage. Good airflow around plants helps reduce pest problems and prevents fungal diseases, such as blight. Using stakes or cages keeps foliage dry, reducing hiding spots for insects while improving plant health!
Signs of common diseases (blight, wilt, etc.)
Late blight shows moldy spots on leaves and fruit. These spots are brown or gray and have a fuzzy texture in damp weather. Early blight causes dark spots on older leaves, leading to yellowing and leaf drop.
Fusarium wilt typically begins with one side of the plant wilting, often accompanied by yellowing leaves. This disease can spread quickly.
The mosaic virus creates mottled yellow patches on foliage and distorts leaf shapes. Monitor plants for unusual spotting or discoloration regularly to catch problems early. Crop rotation helps prevent soil-borne diseases, such as fusarium wilt and late blight, from recurring season after season.
Natural and chemical control methods
Check your plants regularly for pests such as aphids or tomato hornworms. Hand-pick bugs as soon as you see them, especially during the early stages of the infestation. Prune diseased leaves to stop the spread of problems like fusarium wilt or blight.
Use companion planting to attract good insects and repel harmful ones. Planting flowers like marigolds near tomatoes can naturally deter pests. For diseases, apply copper fungicide sparingly to address fungal issues such as late blight.
Rotate crops annually to prevent soil-borne problems from accumulating over time.
Benefits of crop rotation
Crop rotation helps break cycles of soilborne diseases like verticillium and fusarium wilt. Rotating tomatoes with plants from other families, such as wheat or legumes, disrupts soil-borne pathogens.
This reduces the risk of reinfection and improves plant health.
It also helps control pests by altering their food sources. A 3-4 year rotation plan enhances soil fertility and structure, resulting in more vigorous tomato plants. By preventing nutrient overuse from monocropping, crop rotation increases yields and fosters biodiversity that attracts beneficial insects.
Harvesting Tomatoes
Pick tomatoes when they turn bright red and feel slightly soft—this ensures the best flavor and texture.
How to know when tomatoes are ripe
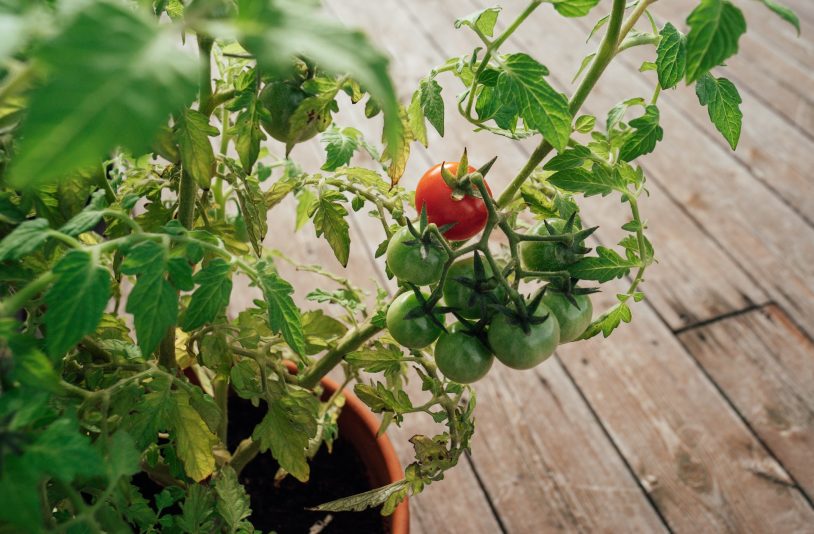
Gently press the tomato; it should feel slightly soft, not mushy. Check the color against what’s listed on your seed packet. For most varieties, ripe tomatoes show a deep red, bright orange, or golden yellow hue with no green patches.
Harvest during cooler times, such as early morning, to minimize fruit stress. Leaving them on the vine too long can cause over-ripening and shorten storage life. Monitor daily for changes in texture and color to ensure they reach their peak ripeness.
Harvesting tips to avoid damage
Use clean, sharp tools to cut tomatoes from the vine. This helps protect the plant and reduces the risk of disease. Handle each tomato carefully to avoid bruising or breaking the skin. Inspect your plants regularly for soft or diseased fruit, and remove it immediately.
Pick tomatoes in the cool morning hours. Cooler temperatures keep them fresh longer. Maintain steady moisture levels by watering regularly and using mulch, such as straw, around your plants.
This prevents cracking in ripe fruits. Store harvested tomatoes at room temperature above 55°F, without stacking, to maintain quality.
Storing freshly picked tomatoes
Keep freshly picked tomatoes at room temperature. Ensure the space remains above 55°F to preserve their flavor and texture. Do not refrigerate them, as cold temperatures can make them taste bland and feel mealy.
Place tomatoes stem side up to avoid bruising. Check them often for soft spots or disease, and remove any damaged ones promptly. If you have green tomatoes, wrap them in newspaper or put them in a paper bag.
Store these in a cool, dark place to help them ripen evenly. Avoid stacking your tomatoes to prevent unnecessary damage.
Saving Seeds for Future Planting
Save seeds from your best tomatoes to grow vigorous plants next year. Dry and store them properly for a fresh start each season.
How to collect, clean, and dry seeds
Pick seeds from fully ripe tomatoes to keep their quality. Scoop them out with a spoon and place them in a clean container. Add water to the seeds and let them sit at room temperature for 2-3 days.
This helps remove the gel coating around the seeds.
After fermentation, rinse the seeds thoroughly under running water. Spread them on a paper towel or screen to dry completely. Keep them in a single layer to avoid clumping. Once dried, store your tomato seeds in airtight containers in a cool, dark place.
This prevents mold and keeps the seeds ready for planting the following season.
Storing seeds for long-term use
Harvest seeds only from fully ripe tomatoes. Rinse them to remove pulp, then let them dry completely; moisture can cause mold. Use paper towels or a mesh screen for drying. This step helps protect the seeds during storage.
Store dried seeds in airtight containers, such as glass jars or freezer bags. Store them in a cool, dark, and dry location, such as a pantry or refrigerator. Label each packet with the tomato variety and harvest date for easy tracking later.
Check seed viability before planting by performing germination tests yearly.
Extending the Tomato Season
Protect your tomatoes from cold with row covers or small greenhouses. Try planting indoors or using patio containers to enjoy fresh harvests longer.
Using row covers or cloches
Row covers and cloches shield tomato plants from frost, letting you extend your growing season. These coverings trap heat and moisture, creating a warm space that helps tomatoes grow faster.
You can plant earlier in spring or keep harvesting into fall with this method.
Cloches also deter pests, such as tomato hornworms, while maintaining a steady nighttime temperature. Be sure to ventilate on sunny days to prevent overheating or excessive humidity. Utilizing these tools can enhance your harvest and safeguard against sudden cold snaps throughout the season.
Tips for fall or overwintering in greenhouses
Use a greenhouse to grow tomatoes through fall and winter. Ensure the plants receive sufficient light, as tomatoes thrive in full sunlight. If sunlight is limited, consider adding grow lights to maintain healthy plant growth.
Water to the soil level to avoid wetting leaves and reduce the risk of diseases such as late blight and leaf spots. Apply copper fungicide regularly to prevent organic diseases. Select tomato varieties that resist common diseases, such as Fusarium wilt and Verticillium wilt, to produce more vigorous plants.
Monitor closely for pests such as aphids or tomato hornworms and act quickly to control them before they spread.
Growing tomatoes indoors or on patios
Growing tomatoes indoors or on patios allows you to enjoy fresh harvests for a longer period. Ensure your plants receive at least 6 hours of sunlight daily. If natural light is limited, consider adding grow lights to promote healthy growth.
Use large, well-drained pots to allow roots to spread and thrive.
Water often, but avoid overwatering by checking soil moisture regularly. Indeterminate tomato varieties are best suited, as they continue to produce fruit until the first frost. Keep up with pruning to manage growth and watch for pests, such as aphids, and diseases, such as blight.
Healthy maintenance leads to a productive plant!
Troubleshooting Common Problems
Tomato plants can experience issues such as yellow leaves, wilting, or damaged fruit. Knowing how to spot these problems early helps you fix them quickly.
Yellowing leaves
Yellowing leaves often mean your tomato plants lack nitrogen. Check if the soil is rich and contains enough nutrients. Adding compost, worm castings, or a high-nitrogen fertilizer can help.
Poor watering habits also harm roots, resulting in yellow leaves. Keep the soil evenly moist but not soggy to avoid stress.
Hot temperatures above 86°F may also cause this issue and even lead to blossom drop. Diseases such as Fusarium wilt and mosaic virus can harm plants; in such cases, removing infected plants is necessary.
Prune the lower leaves to improve air circulation and prevent disease spread. Monitor plants weekly for signs of stress or problems before they worsen.
Blossom end rot
Blossom end rot causes ugly dark spots at the bottom of your tomatoes. This happens when the plant lacks calcium. Poor watering habits exacerbate the issue because dry spells prevent plants from absorbing sufficient calcium.
Maintain consistent soil moisture to prevent this issue.
Test your soil before planting tomatoes. Use compost and amendments to improve soil nutrients and drainage in both in-ground and raised beds. Adding mulch, such as straw, around tomato plants also helps maintain balanced water levels.
Picking disease-resistant varieties can give you healthier results, too!
Cracking fruit or slow ripening
Cracking in tomatoes results from uneven watering. Dry spells followed by heavy rain can cause the skin to split. Maintain steady soil moisture by deep watering and using straw mulch or other mulching methods.
This helps retain water and prevents sudden changes.
Slow ripening may occur if nighttime temperatures drop below 50°F or daytime temperatures exceed 86°F. Both extremes stress tomato plants, delaying fruit coloration. Regularly check your soil moisture and ensure healthy tomato growth with consistent care.
Wilting despite watering
Poor soil drainage can cause wilting even with regular watering. Water collects around the roots, depriving them of oxygen and leading to root rot. To avoid this, use well-drained soils or raised beds.
Testing the soil before planting helps ensure proper conditions for your tomato plants.
High temperatures above 86°F also stress tomatoes, causing them to wilt on hot afternoons. Mulching tomatoes helps keep the soil cool and retains moisture for extended periods. If you are growing tomatoes in containers, check the soil moisture regularly, as it dries out more quickly in extreme weather.
Final Tips
Growing tomatoes can be fun and rewarding. With the proper care, your plants will thrive. From selecting varieties to watering and pruning, each step helps you get closer to a fresh harvest.
Homegrown tomatoes taste better and are nutrient-dense. Start planting today and enjoy the fruits of your hard work!