Cultivating corn can be a rewarding and exciting endeavor. You don’t have to be a seasoned farmer to achieve success! With just a bit of knowledge about planting techniques and the correct seasonal timing, you can nurture your corn plants from tiny seeds into towering green stalks that dance in the breeze, reaching heights of six feet or more.
Whether you choose to cultivate rows of corn in your spacious garden or opt for an eye-catching container garden on your porch, the process is filled with anticipation as you watch your plants grow and thrive.
This guide will walk you through everything you need to know step by step so you can enjoy the fruits (or ears!) of your labor in no time.
Jump to Section [Hide]
- Understanding Corn Growing Basics
- Choosing the Right Corn Variety
- When and Where to Plant Corn
- Preparing the Planting Site
- How to Plant Corn Seeds
- Watering and Moisture Management
- Fertilizing Corn for Healthy Growth
- Weed and Mulch Management
- Managing Pests and Diseases
- Special Growing Situations
- Harvesting Your Corn
- Troubleshooting Common Problems
Understanding Corn Growing Basics
Corn thrives in warm weather and follows a unique growing cycle. Learning these basics lays the foundation for healthy plants and plentiful harvests.
Corn as a warm-season crop
Corn grows best in warm weather. It requires 60-100 frost-free days to thrive. Plant it only after the last frost, when the soil reaches at least 60°F. Supersweet corn varieties require soil temperatures of 65°F or higher for good germination.
This crop is sensitive to cold temperatures, especially young seedlings. If a late frost threatens, cover them with row covers to protect their growth. In hot conditions, corn can grow 3-4 inches per day.
To keep plants and corn healthy, avoid exposing them to chilly weather early on.
Key growth stages
Corn grows in clear stages, each with unique needs. The first stage begins with germination. Seeds sprout within 7-10 days if the soil temperature is at least 50°F. Next, seedlings develop roots and leaves quickly.
Within 2-3 weeks, taller stalks will form.
Tasseling occurs around mid-growth when corn tassels appear. These release pollen to fertilize silk on corn ears. Silk production begins next, as silks emerge from the ears to catch pollen during wind pollination.
After pollination, kernels develop and mature over approximately 20 days, from silking until they are ripe for harvest. At this point, brown or dry silks indicate ripeness; kernels should be plump and release a milky sap when gently pressed.
Choosing the Right Corn Variety
Picking the right corn variety makes a big difference in your garden. Think about your needs, whether you want sweet kernels, popping options, or colorful stalks for decoration!
Sweet corn
Sweet corn has four main types: sugary (su), sugar-enhanced (se), shrunken or supersweet (sh/sh2), and synergistic (sy). Classic sugary varieties like SILVER QUEEN taste best right after harvest.
Supersweet ones, such as SWEET SUNSHINE, keep their flavor for up to a week. Sugar-enhanced types offer extra sweetness and improved storage.
Plant different sweet corn varieties two weeks apart for staggered harvests. Check ripeness by looking at the silks; they should be dry and brown. Gently squeeze kernels; ripe ears leak milky sap when pierced.
Harvest in the morning while it’s still cool to lock in flavor!
Popcorn
Popcorn grows best in full sun and fertile soil. It thrives with proper space for wind pollination, so block planting works great. Keep it at least 250 to 300 feet away from sweet corn.
This avoids cross-pollination and ensures proper kernel quality.
Harvest popcorn once the husks are dry and brown. Kernels should feel hard when pressed with a fingernail. After harvesting, let the ears dry for 2 to 3 weeks before removing the kernels for storage or popping.
Ornamental corn
Ornamental corn is grown for decoration, not for eating. Its colorful kernels make it perfect for fall displays or crafts. Popular types include Glass Gem, with its semi-transparent rainbow hues, and Painted Mountain, with vibrant maize colors.
Plant seeds in blocks to support wind pollination. Avoid planting near other corn varieties to prevent cross-pollination. Ornamental varieties require 60–100 frost-free days to develop their bright colors fully.
Wait until mid-to-late spring, when the soil warms to at least 60°F, before sowing seeds in your garden.
Field/dent corn
Field corn, also called dent corn, is mainly grown for animal feed and industrial uses. It covers over 92 million acres in the U.S. alone each year. Unlike sweet corn, it’s not eaten fresh; it’s used to make processed foods such as cornmeal or to produce fuels such as ethanol.
It thrives best at a planting density of 22,000–35,000 plants per acre. The crop matures in just 2–3 months and is harvested when kernels reach 23–25% moisture. Late varieties grow well in clayey or silty soils but aren’t ideal for small home gardens due to space needs and pollination challenges.
When and Where to Plant Corn
Plant your corn in warm soil with plenty of sunlight. It’s the perfect start for growing strong, healthy crops.
Ideal planting time
Start planting corn about 2 to 3 weeks after the last frost in spring. This timing ensures the soil is warm enough for seeds to sprout. Soil temperatures should be at least 60°F, though supersweet corn needs slightly warmer soil, around 65°F.
In most parts of the U.S., complete planting is by late spring. Avoid waiting too long, as corn requires a growing season with 60 to 100 frost-free days. If you’re eager for an early start, begin seeds indoors 3 to 4 weeks before the final frost date in your area.
Rotate crops yearly for healthier plants and better harvests.
Soil temperature requirements
Corn seeds need soil warmth to sprout. The minimum soil temperature for germination is 60°F. Supersweet corn varieties are pickier and require soil temperatures of at least 65°F. If planted in cold soil, seeds may take longer to germinate or fail to germinate.
Use a soil thermometer to measure soil temperature at planting depth before sowing. In cooler regions, raised beds can help warm the ground more quickly. Covering the soil with black plastic mulch also traps heat, encouraging stronger growth early on.
Waiting until conditions are right ensures better sprouting and healthier plants later.
Choosing a sunny location
Select a spot that receives 6–8 hours of direct sunlight each day. Avoid areas shaded by trees, fences, or buildings. Corn needs full sun to grow healthy and produce full ears with well-filled kernels.
If using containers, place them in the sunniest part of your garden or patio. Sunlight is essential during pollination and ripening. More sunlight means sweeter and higher-yielding corn on the cob!
Preparing the Planting Site
Get the soil ready to give your corn strong roots. A healthy site sets the stage for big, tasty harvests!
Loosening the soil
Prepare the soil to a depth of 8–12 inches. This encourages deep-root growth in your corn plants. Use a garden fork or tiller to break up compacted soil. Remove rocks, debris, and clumps that could impede root growth or disrupt drainage.
Loose soil improves water flow and air movement. This helps plant roots grow stronger. Avoid working in wet soil, as it can cause compaction and damage root systems later.
Adding compost or aged manure
Mix aged compost or well-rotted manure directly into the soil before planting corn. Spread 2–3 inches of organic matter over the area, then work it into the top 6 inches of soil.
This boosts fertility and improves drainage, helping corn thrive.
Heavy compost or aged manure provides rich nutrients for strong stalks and full ears. In poor soils, use a product like Miracle-Gro Performance Organics to add extra plant food. Well-decomposed material prevents burning young seedlings while promoting healthy growth.
Ensuring proper drainage
Pick a spot that doesn’t collect water after rainfall. Low-lying areas can lead to waterlogging, which hurts roots. Test your soil’s drainage by digging a hole and filling it with water.
If it drains within 24 hours, you’re good to go.
If you have heavy or clay soils, add compost or sand to improve drainage. Raised beds also help in these situations. Mulch retains moisture but shouldn’t trap too much water at the base of plants.
Proper drainage prevents diseases such as root rot and damping-off, keeping your corn healthy.
Ideal pH range
Corn grows best in soil with a pH between 6.0 and 6.8, but it can tolerate a range of 5.5 to 6.5. This range ensures nutrients are available for strong roots and healthy growth.
Use a soil test kit before planting to check the pH level. If the soil is too acidic, add lime to raise its pH. For alkaline soils, apply sulfur to lower the pH. Annual checks help maintain this balance, especially in intensive beds or containers where levels may shift over time.
How to Plant Corn Seeds
Plant your corn seeds about 1-2 inches deep in loose soil, and give them plenty of space to grow strong.
Seed depth
- Place corn seeds 1–2 inches deep in the soil. In dry conditions, you can go as deep as 2.5 inches to help the seeds reach moisture. Shallow planting leads to weak roots and dried-out seeds.
- Use a ruler or a planting stick to measure depth accurately. Heavy soils, like clay, shouldn’t have seeds deeper than 2 inches. Proper seed-to-soil contact boosts germination and vigorous growth right from the start.
Spacing
- Plant corn seeds 8–12 inches apart. This gives them plenty of room to grow strong and tall. Overcrowding your plants can lead to smaller ears and lower yields. For field corn, keep one foot between plants and three feet between rows for better airflow.
- Raised beds two feet wide allow for three rows. A four-foot-wide bed can accommodate up to six rows. In containers, ensure they are at least 12 inches deep and 18 inches or more wide; a large tote (30 gallons) can comfortably hold about 11 plants.
Block planting vs. single rows
- Block planting boosts corn pollination. Arrange seeds in blocks of 3–4 short rows instead of a single long row. Wind-pollinated crops like corn require close spacing so pollen can reach the corn silks easily.
- In small gardens, plant 15 seeds (1 foot apart) within a 3 x 5-foot bed. For larger spaces, expand to at least 4 rows, each 10 feet long. Single rows often result in poor pollination and incomplete ears, reducing your harvest. Block planting yields higher yields and fuller corncobs.
Row spacing
- Space rows 12–24 inches apart for a home garden. This provides sufficient space for the plants to grow and allows air to circulate. Proper spacing also reduces disease risk.
- For fields, leave 3 feet between rows. In raised beds or small spaces, you can go as close as 12 inches. Keep clear paths between rows for easier watering and weeding. Avoid wide gaps that might hurt corn pollination efficiency.
Thinning seedlings
- Thin corn seedlings once they reach 3–4 inches tall. Leave only one healthy plant per hill. This prevents overcrowding and allows each stalk to grow strong and sturdy. Gently remove extra seedlings by hand to avoid disturbing the remaining roots.
- Discard unwanted plants or move them to another area if space allows. Thinning is even more important in small gardens or containers, where space is tight. Healthy thinning creates uniform rows and boosts yields. Do this early for better corn pollination, stronger stalks, and fuller ears of sweetcorn!
Watering and Moisture Management
Keep the soil damp, water deeply, and protect your corn from drying out.
Keeping soil consistently moist
Water the soil evenly from planting to harvest. Moisture is vital during the pollination and ear-filling stages. Dry spells can hinder kernel growth, leading to poor yields or deformed ears.
Use mulch, such as straw or shredded leaves, to hold moisture and reduce evaporation.
Check root-level moisture with a simple dig test or a soil moisture meter. Avoid letting the ground dry out too much between waterings. Deep soaking helps roots grow strong, but skip heavy watering that causes puddles, as corn dislikes soggy conditions.
Deep watering
Irrigate deeply to help roots grow down to 12 inches or more. This strengthens the plants and improves their ability to find moisture. Shallow watering does not reach deep roots, so it is less effective.
Use a soaker hose or drip line for even, water-conserving soaking.
Focus on deep watering during the silking and kernel-fill stages, as corn needs extra moisture then. Early-morning watering reduces evaporation and keeps leaves dry, lowering the risk of diseases such as northern corn leaf blight.
Constantly water around the base to avoid wetting the foliage directly.
Avoiding waterlogging
Waterlogged soil can harm your corn. It drowns the roots and stunts growth. Make sure your soil drains well to avoid standing water. Adding compost or aged manure improves drainage while boosting nutrition.
Raised beds or ridges work great in heavy soils. They lift plants above the pooling water during rainy periods. Monitor rainfall carefully, so you don’t overwater after a downpour. Use mulch sparingly; a thin layer helps maintain steady moisture without trapping excess water.
Always water early in the day to prevent fungal issues overnight!
Fertilizing Corn for Healthy Growth
Feed your corn plants to help them grow tall and strong.
Pre-plant soil amendments
Start by mixing aged compost into your soil. This improves the structure and adds essential nutrients for corn growth. Apply a generous layer, especially if your soil is low in fertility.
Compost also supports beneficial microbes that promote healthy roots.
Test your soil before planting to check nutrient levels and pH. Corn prefers slightly acidic to neutral soils with a pH of 6.0-6.8. If needed, adjust the pH using lime or sulfur during preparation.
Adding organic matter, such as compost or manure, boosts plant nutrition and supports strong growth throughout the season.
Side-dressing with nitrogen
Apply nitrogen-rich fertilizer when your corn plants reach 2 feet tall. Use 2–3 pounds of 10-10-10 fertilizer per 100 square feet. Place the fertilizer in a band about 6 inches from the base of each plant to avoid burning the roots.
Water right after applying the fertilizer so nutrients soak into the soil quickly. Nitrogen promotes rapid growth and supports healthy kernel development. If leaves turn pale or growth slows, repeat side-dressing as needed throughout the growing season to encourage more vigorous plants and better yields.
Organic fertilizer alternatives
Use compost or aged manure to enrich your soil naturally. They provide steady nutrients and improve long-term soil health. Avoid fresh manure, as it can harm seedlings and spread diseases.
Fish emulsion or seaweed extract is an effective organic liquid fertilizer. These boost nitrogen levels for healthy growth. You can also plant beans alongside corn using the Three Sisters method to replenish the soil with natural nitrogen.
Mulching with grass clippings also helps, as it breaks down over time and adds additional nutrients. Rotate crops each season to prevent nutrient depletion in your garden beds.
Weed and Mulch Management
Control weeds early to give your corn space to grow strong. Use mulch to retain moisture and slow weed growth.
Hand-pulling or hoeing weeds
Pull weeds by hand or use a hoe while your corn plants are young. Weeds grow fast and steal water, sunlight, and nutrients from your crop. Remove them early before they get out of control.
Shallow hoeing works best to avoid hurting the shallow roots of your corn.
How the soil is when it’s slightly damp for easier weed removal. Regular weeding also helps prevent pests and diseases in your garden. Avoid using chemical herbicides near edible sweet corn when possible, as natural methods such as pulling or hoeing are safer for growing healthy produce.
Applying mulch
Spread a 3-inch layer of organic mulch around your corn plants after the seedlings are stable. Use grass clippings, straw, or composted leaves, as they retain soil moisture and suppress weeds.
Leave a few inches of space between the mulch and corn stalks to avoid rot. As the mulch breaks down, it will enrich the soil with nutrients. Add more mulch during the growing season if needed to maintain the layer.
Managing Pests and Diseases
Pests and diseases can damage your corn plants quickly if left untreated. Use natural methods, such as insecticidal soap or Bacillus thuringiensis, to control them.
Common pests
Corn earworms are a major threat to your crop. They chew through the silks and damage kernels. Check your ears often, and remove any affected tips. Tight-husk corn varieties can help reduce their impact.
Cucumber beetles, cutworms, flea beetles, Japanese beetles, wireworms, and earwigs also harm plants. Hand-pick them or use insecticidal soap to control outbreaks. Deer and raccoons love fresh corn, too.
Set electric fences at 4 inches and 12 inches high to keep raccoons out. For birds near harvest time, try netting or scarecrows as simple repellents. Crumpled newspaper around plants can deter nearby wildlife from digging in the soil!
Disease prevention
Choose resistant corn varieties, such as Silver Queen or Sweet Sunshine, to reduce disease risk. Rotate crops each year to prevent issues such as rust, which appears as reddish spots on leaves.
Compost plant residues to stop disease buildup in the soil. Avoid overhead watering, as wet leaves can promote the growth of problems like downy mildew.
Ensure good air circulation around your plants, especially in damp conditions. This helps lower the chances of anthracnose and mildew spreading. If you see yellow or black spots caused by anthracnose, remove and destroy infected plants right away.
Use fungicides only if needed and always follow label instructions for safe use.
Best practices
Rotate your corn crops every year to prevent pests and diseases from building up in the soil. Clean planting sites thoroughly by removing old stalks, corn husks, and other debris after each season.
This stops insects or pathogens from lingering.
Use disease-resistant hybrids to protect your crop without extra effort. Keep an eye out for early signs of problems, such as wilting leaves or damaged silks. Remove infected plants immediately to stop the spread.
Apply mulch around the base of plants to suppress weeds, which can also harbor pests.
Special Growing Situations
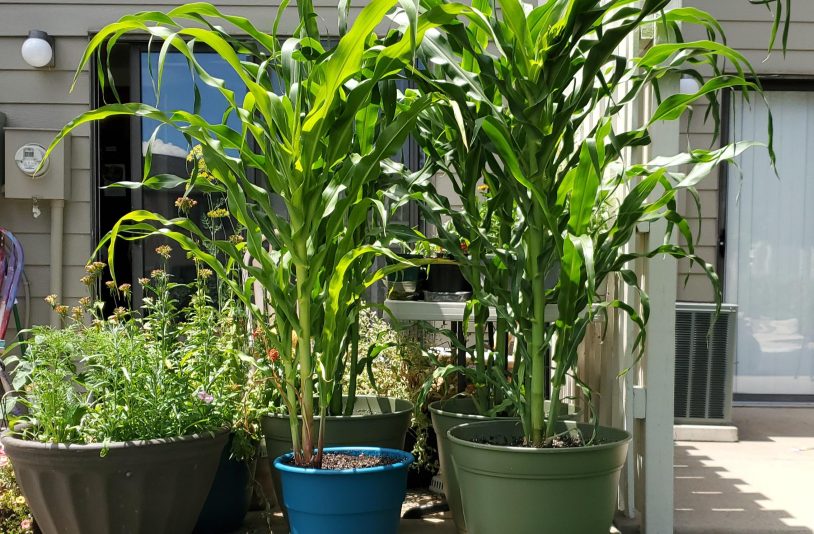
You can grow corn even in tight spaces or containers, making it perfect for small gardens.
Growing corn in small spaces or containers
Grow sweet corn in containers at least 12 inches deep and 18 inches or more wide. A large, 30-gallon tote can hold up to 11 plants. Use compact or dwarf varieties for better growth in small spaces.
Fill containers with high-quality potting mix or compost-enriched soil. Keep the soil moist but avoid waterlogging. Fertilize regularly, as nutrients leach quickly during watering. Plant seeds close together in a block formation to ensure proper wind pollination for full ears of corn.
Choosing compact or dwarf varieties
Compact corn varieties like Luther Hill are great for small spaces. These dwarf sweet corns grow 4–5 feet tall and produce 4–6-inch ears. They mature quickly, often in 60–70 days, making them a fast option for your garden.
You can plant compact types in containers or raised beds with ease. Block planting is still needed to ensure proper pollination. Dwarf varieties may not yield as many ears per stalk, but they perform well in tight spaces and save space.
Using raised beds
Raised beds make growing corn easier and more productive. They help prevent waterlogging by improving drainage and preventing soil compaction, thereby promoting strong root growth. Fill the beds with rich, compost-amended soil to provide essential nutrients.
Corn thrives in warm conditions, so these beds allow faster soil warming for earlier planting.
Use mulch to maintain moisture levels and prevent weeds from taking over. A 2-foot-wide bed can hold three rows of corn plants, while a 4-foot bed fits up to six rows. This setup supports better pollination, as wind disperses pollen more effectively in closely spaced blocks than in long single rows.
Harvesting Your Corn
Check the ears for plump kernels and brown, dry silks. Gently twist to remove them from the stalk without damaging the plant.
Signs of ripeness
Ears of corn should look plump and full. Kernels must fill the tips. Brown, dry silks signal ripeness, but husks should stay green.
Press a fingernail into a kernel. Milky sap shows the corn is ready to harvest. Hot weather above 85°F shortens peak sweetness to just 1–2 days, so timing is key. The upper ear on each stalk usually ripens a day or two before the lower one.
Best time to harvest
Pick corn early in the morning, when it’s cool, for the best flavor. This is especially true of sweet corn, which quickly loses its sweetness after harvesting if left too long.
Check daily once the silks turn brown and the ears feel full. Harvest before frost or big storms hit to protect your crop. If you stagger plantings every 10–14 days, you’ll enjoy a steady supply rather than a single large harvest.
How to remove ears
Grasp the ear firmly with one hand. Twist it downward while pulling gently to detach it from the stalk. For larger or tougher ears, use both hands to avoid damaging the plant.
Inspect each ear as you harvest. Remove only ripe ones to preserve flavor and leave others on the stalk until ready. Place harvested ears in baskets or bins without stacking them too high to prevent bruising.
Discard damaged or pest-infested ears right away.
Troubleshooting Common Problems
Corn can face issues such as pests, poor growth, or pollination problems.
Wilting or yellowing leaves
Yellowing leaves often mean a nitrogen deficiency. Use nitrogen-rich fertilizers to help the plants recover. Adding compost or aged manure can also improve soil nutrient levels and help prevent this issue.
Wilting may result from insufficient water. Corn needs about 2 inches of water every week to stay healthy. Hand-pull weeds around the plants, as they compete for nutrients and stress shallow roots, which can lead to leaf problems.
Watch for diseases such as anthracnose or downy mildew; if left unchecked, they can cause wilting and yellowing.
Poor kernel development
Poor kernel development happens when pollination is incomplete. Inadequate spacing can impede wind pollination, resulting in missing or uneven kernels on ears. Plant corn in blocks rather than rows to improve pollen movement.
Lack of nitrogen also harms kernel growth. You may notice yellowing leaves caused by this deficiency. Add a side-dressing of nitrogen fertilizer during growth stages for better results.
High heat, water stress, or cross-pollination from nearby varieties can further affect kernel quality. Keep soil moist and use appropriate isolation zones to prevent these issues. Harvest when tassels turn brown, and kernels feel milky for the best outcome.
Pest or wildlife damage
Raccoons love corn and can destroy your plants overnight. Use a two-strand electric fence to keep them out. For extra protection, try flashing lights or leave a radio by the cornfield.
Crinkled newspaper works too! Deer also browse on stalks and browse on ears. Hang human-scented items, such as worn clothes, nearby, or install higher fences to deter them.
Corn earworms harm silks and kernels. Apply vegetable oil on silks to stop damage early. Plant tight-husk varieties for natural pest resistance. Blackbirds peck at the crop; cover plants with bird netting to protect them.
Act quickly if you spot pests or signs of chewing to save your harvest!
Poor pollination
Poor pollination can lead to small, underdeveloped corn ears. Overcrowded plants reduce airflow, making wind pollination harder. Keep your corn in blocks rather than single rows for better cross-pollination.
Hot temperatures or dry weather can also hurt pollination. Corn silks need moisture to catch pollen grains. Water the soil regularly during this stage, but avoid soggy conditions if you notice uneven kernel development. Hand-pollinate by shaking the tassels over the silks daily for a few days.
This boosts kernel formation and helps maximize your harvest!
Final Tips
Growing corn can be rewarding and straightforward. With the right prep, good seeds, and proper care, you’ll have thriving plants. Watch for healthy stalks and full ears as your garden grows.
Harvest at the perfect time to enjoy fresh, sweet results. Enjoy the fruits of your labor!