Asparagus may require some patience initially, but once it establishes itself, it rewards you with fresh, tender spears every spring for years to come. It’s one of those garden vegetables that keeps on giving.
It doesn’t matter if you’re planting in a backyard garden or using raised rows. This guide will walk you through everything you need to know, from selecting the correct location to harvesting your first spear.
Let’s dig in!
Jump to Section [Hide]
Choosing the Right Location
Find a sunny spot with well-draining soil. Healthy asparagus starts with the perfect location for strong roots and growth.
Full sun exposure
Choose a spot with full sun for your asparagus beds. Exposure to sunlight helps plants grow firm, thick spears and prevents them from becoming weak and spindly. Aim for at least 6–8 hours of direct sunlight daily.
Shade from trees, buildings, or tall crops can harm growth and reduce yield.
Plant asparagus on the north side of your garden to avoid shading nearby vegetables. Sunlight also keeps ferns dry, reducing the risk of diseases such as rust. In cooler areas, good sun exposure is even more critical for healthy spear production.
Well-drained soil
Well-drained soil is key to growing healthy asparagus plants. Waterlogged areas can cause root and crown rot, leading to stunted growth. Avoid spots where water pools after heavy rains.
Loose, friable soil allows deep root systems to expand easily.
For clay soils, plant crowns 6–8 inches deep. In sandy soils, plant roots should be planted 10–12 inches deep for better stability and moisture retention. Adding compost or other organic matter improves drainage while boosting nutrient availability.
Raised beds are a great solution if your garden struggles with poor drainage.
Preparing the Soil
Good soil makes all the difference for asparagus. Mix in compost or organic matter to give your plants a strong start.
Soil pH requirements (6.5–7.0)
Asparagus grows best in soil with a pH of 6.5 to 7.0. Acidic soils below this range weaken plants and cause nutrient deficiencies. Test your soil before planting. This step helps you avoid future issues.
If the pH needs adjusting, add lime to raise it to the ideal level. Mix it into the soil before planting asparagus crowns.
High soil phosphorus levels can be tricky. Use low-phosphorus fertilizers, such as 32-3-10 or 30-0-10, if your soil test indicates excess phosphorus. Regular soil testing, done every year or two, helps keep plants healthy.
Keeping the correct pH ensures strong asparagus growth and high yields.
Adding organic matter and compost
Mix well-rotted manure or compost into the soil before planting. This improves drainage, boosts fertility, and helps asparagus ferns grow stronger. In new beds, blend organic matter deeply into the topsoil to promote better root growth.
Use compost to retain soil moisture and support healthy asparagus spears. Apply it in early spring or follow soil test results to avoid over-fertilizing. Adding organic mulch, such as straw or wood chips, helps prevent weeds and keep the ground moist.
Planting Asparagus
Planting asparagus takes some planning, but it’s worth the effort. Choose between seeds or crowns, it depends on your patience and gardening goals!
Starting from the crowns
- Choose one-year-old asparagus crowns to get a head start. These are roots with buds that grow both vertically and horizontally. Ensure the crowns are firm, healthy, and free of disease before planting.
- Dig trenches 6–8 inches deep in heavy clay soil or 10–12 inches deep in sandy soil. Space the crowns about 12 inches apart, with the buds facing up. The old method of spreading their roots like an octopus is no longer needed.
- Add half of the recommended phosphorus and potassium fertilizer to the furrow at planting time to ensure proper plant nutrition.
Starting from seeds
- Start seeds 12–14 weeks before the last expected frost date. Soak them overnight to speed up germination. Plant each seed 1 inch deep and space them 2–3 inches apart in rows that are 1 foot apart.
- Use a nursery bed for better control over growth conditions.
- Keep soil warm at 60–85°F for proper germination. This can take about three weeks. Mulch seedlings with 4–6 inches of straw by late October to protect them during winter.
- Dig up the crowns the following April and transplant them to their permanent location after hardening off the seedlings for 10 days.
Spacing and trench depth
- Dig trenches 6–12 inches deep based on your soil type. Use 6–8 inches for heavy clay and 10–12 inches for sandy soils. Place crowns 12 inches apart, head-to-toe. Keep rows at least 3 feet apart to give plants room to grow.
- Cover the crowns with 2–3 inches of soil initially. Gradually back-fill the trench with loose soil as spears develop. Avoid clumps of dirt during filling to prevent spears from breaking.
- Match trench length exactly to the number of crowns you plant to avoid overcrowding. Proper spacing helps improve spear production and reduces disease risks, such as asparagus rust, and insect pests, including aphids and cutworms.
Watering and Fertilizing
Water your asparagus regularly to help it grow strong, especially during its first year. Use organic fertilizers to feed the plants and improve soil health.
Regular watering during establishment
Give asparagus at least 1 inch of water each week during the first year. Dry spells or sandy soils may require more frequent watering to keep roots moist and healthy.
Stick to consistent watering to avoid weak, spindly spears later. Saturating soil helps growth, reaching 10 inches deep in sandy areas and 6 inches in clay. Avoid overhead sprinklers to reduce the risk of fungal diseases.
Mulching helps retain moisture and stabilize soil temperature, too!
Fertilizer recommendations
Test your soil before planting. This helps you know its nutrient needs. Without a test, use 1–1.5 pounds of 10-10-10 fertilizer per 100 square feet before planting asparagus officinalis.
Mix it into the soil thoroughly.
At planting, add half the recommended phosphorus and potassium into the furrow where crowns grow. Once crowns start sprouting, apply nitrogen fertilizer to boost growth. In phosphorus-rich soils, use low-phosphorus options, such as 32-3-10 or 30-0-10, to avoid buildup.
Add composted manure or plant food in spring or after harvest if needed. Repeat soil tests every three years for best results!
Controlling Weeds
Weeds can compete for nutrients and space with your asparagus plants. Keep them in check to ensure healthy growth.
Mulching for weed prevention
Use organic mulches such as straw, wood chips, or compost to prevent weed growth. Lay 4–6 inches of straw on seedling beds in late October. This keeps weeds down and protects the crowns from temperature changes.
Pushing the mulch aside in early spring helps spear emergence, as it can slow growth if left in place. Cover both the beds and aisles for better weed control, especially in bigger gardens. A well-mulched bed saves time by reducing the need for frequent weeding.
Hand-pulling weeds
Hand-pulling weeds is the most effective method for managing perennial weeds, such as Canada thistle and quackgrass, in asparagus beds. Do this regularly during the first two years, as crowns are still developing.
Focus on removing weeds before they flower and spread seeds to reduce future problems. Wet soil after rain makes pulling easier and ensures roots come out fully.
Be careful not to damage shallow asparagus roots while weeding by hand. Avoid using tools such as hoes or tillage equipment, as they may damage crowns or new spears. Regularly inspect your garden throughout the season for small patches of weeds.
Address these issues promptly to prevent further spread.
Caring for Asparagus Plants
Healthy ferns mean stronger roots. Let them grow tall and green. Clear out dead plants in the fall to keep your patch neat and thriving.
Supporting healthy fern growth
Let spears grow into tall ferns after the harvest season ends, usually by July 1. These ferns store energy in the crowns for future asparagus growth. Avoid cutting or harvesting any spears during the first year to help build strong crowns.
Stake or tie the ferns if you live in a windy area to stop them from snapping. Fertilize early in spring or right after harvest to boost fern health and size. Remove weeds regularly, either by mulching or by hand, to reduce competition for nutrients and water.
Watch closely for signs of pests, such as asparagus beetles, and treat problems promptly with insecticidal soap if needed.
Removing dead ferns in the fall
Cut back brown, dead ferns after frost kills them in late fall. Use pruners to trim them down to ground level. Mature ferns can grow 4–6 feet tall, so sharp tools make the job easier.
Removing dead ferns helps reduce pests and diseases that can survive the winter. It also prevents debris from piling up in your asparagus bed.
Dispose of the dead ferns away from your garden. After cleanup, add mulch to protect the crowns during winter. Compost or soil amendments can also improve the area for next year. Avoid cutting green ferns; wait until they turn completely brown.
This fall task promotes healthier plants and better spears next season.
Managing Pests and Diseases
Keep an eye out for insects like Japanese beetles or asparagus pests, they can quickly harm your plants. Use natural methods or pesticides carefully to protect your garden asparagus from diseases.
Common pests affecting asparagus
Cutworms can cut asparagus spears at the base, leaving them bent or broken. They are worse in weedy beds, so weed management is key. Hand-pulling weeds and keeping the area clean reduces damage.
Asparagus beetles cause browning, scarring, and crooked shoots. Both standard and spotted types need control. Pick adult beetles by hand or use safe pesticides if needed. Japanese beetles harm foliage but can be controlled with _Bacillus thuringiensis_ (Btg), milky spore treatments, or nematodes.
Aphids also attack ferns, but are often kept in check by natural predators like ladybugs. For heavy infestations, spray your plants with water or a soap solution to prevent stunting caused by these insects.
Disease prevention tips
Avoid overhead watering to prevent soil-borne fungal diseases, such as Fusarium. Stick to drip irrigation or water at the base of plants. Use disease-resistant varieties, such as Jersey Knight or Jersey Giant, to improve growth and reduce issues.
Remove infected plant material immediately, and sanitize tools after every use. This prevents pests and vectors from spreading diseases like asparagus rust or purple spot. Skip high-phosphorus fertilizers, as they weaken plants over time.
Harvesting Asparagus
Harvesting asparagus is exciting, it’s the reward for all your hard work. Learn how to pick spears at the right time to keep plants healthy and productive!
When to start harvesting
Start harvesting asparagus in the second spring if the plants are vigorous. For seed-grown asparagus, wait until the third year after transplanting.
Pick spears that reach 6–8 inches tall. Harvest for only two weeks in year two to avoid weakening crowns. In later years, it extends to 4–6 weeks but stops when spears become thin or buds open.
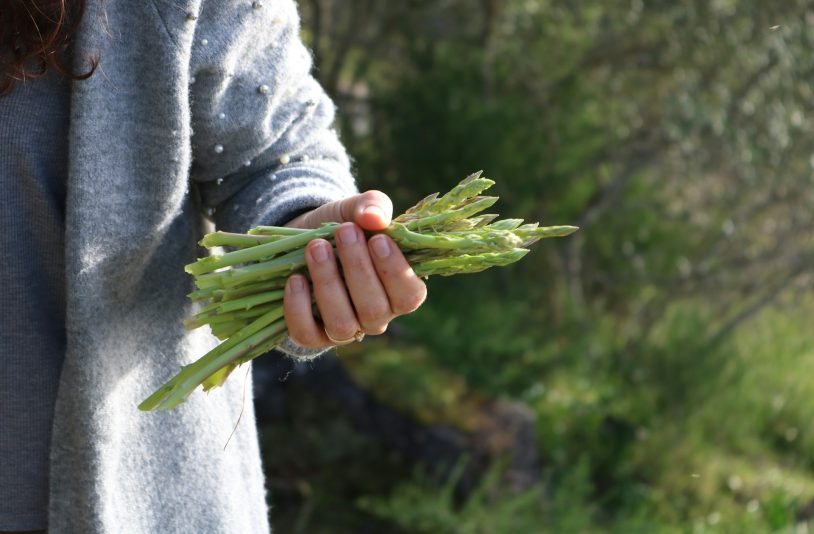
How to harvest spears properly
Harvest spears once they are 6–8 inches long and as thick as a pencil. Snap them off at or just below the soil surface to avoid tough lower parts. Use sanitized tools when cutting to minimize the risk of disease transmission.
Check your beds daily during peak season since spears can grow up to 2 inches per day. Harvest all spears in the window to promote new growth. Avoid thin or oddly shaped spears, as these show crown fatigue.
Take care not to hurt nearby crowns or emerging shoots while working.
Storing Asparagus
Fresh asparagus doesn’t last forever, so learning to store it is key. Keep your spears crisp and flavorful with simple methods that work!
Short-term storage tips
Place freshly harvested asparagus upright in a container with a bit of water. Cover the spears loosely with plastic wrap or a bag. This helps retain moisture and prevents drying.
Keep the container in your refrigerator at 32–36°F.
Avoid washing the spears before storing. Any added moisture can cause them to mold. Check the asparagus daily for signs of spoilage. Remove any spears that look mushy or slimy. Use the asparagus within a week for the best flavor and texture.
Freezing asparagus for long-term use
Blanch asparagus spears for 3–5 minutes to lock in color, flavor, and texture. After blanching, cool them quickly in ice water. This stops the cooking process and keeps the spears crisp.
Dry the cooled spears well before placing them in airtight freezer bags or containers. Label each bag with the date and variety of asparagus you used. Frozen asparagus can last up to 12 months without losing quality if stored properly.
Growing Asparagus in Containers
You can grow asparagus in pots if you don’t have garden space. Use the right container and soil to keep your plants healthy.
Selecting the right container
Select a container that is at least 18 to 24 inches deep. Shallow containers won’t allow asparagus roots to grow properly. Select one that is wide enough for several crowns, leaving approximately 12 inches of space between each crown.
Ensure it has drainage holes to prevent water buildup. Lightweight materials are suitable if you plan to move the container frequently, but they may require more frequent watering. Dark-colored pots can heat up in full sun, so it’s essential to check soil temperatures regularly.
Use food-safe, UV-resistant materials to ensure plant safety and durability. Adding a saucer underneath helps protect surfaces from excess water.
Soil mix and care requirements
Use a well-draining potting mix enriched with compost or aged manure. This helps keep the roots healthy and provides them with essential nutrients. Maintain soil pH between 6.5 and 7.0 for optimal asparagus growth in containers.
Water the container soil regularly, as it dries out quickly, but avoid overwatering to prevent root rot. Add mulch on top to retain moisture and prevent weeds from sprouting. Use a balanced, slow-release fertilizer at planting time, then reapply during the growing season.
Refresh your potting mix every 2 to 3 years to replenish nutrients and reduce the risk of disease. Support tall ferns with stakes if strong winds are common where you live. Monitor containers closely for pests, as they can stress plants more quickly than garden beds do.
Final Tips
Growing asparagus takes patience, but it’s worth it. With proper care, you’ll enjoy fresh spears for years to come. Select a sunny spot, prepare the soil thoroughly, and keep weeds at bay. Follow these steps and watch your garden thrive! Fresh asparagus is just a season away from being on your plate.